Introduction
Whenever you decide to adopt a new web framework, there are two questions you must answer:
- Where will I start learning from?
- When will I know if I’ve learned enough to start building?
The answer to the first question is often straightforward: the framework’s documentation. You read the docs, and you get first-hand knowledge from the framework’s creators of how it works.
To the second question, there is no simple answer. Frameworks often include a “Getting Started” or “Introduction” section on their docs. They do this to give new users a taste of how things work and familiarize them with the basics. But such information isn’t enough to build a full-fledged app. To learn how to do so, you’re expected to dive deeper into the docs.
Still, in search of an answer to the second question, you’re now faced with these options:
- Read the docs to the end. Once you’ve finished, you’ll presumably have learned everything necessary to start building.
- Watch tutorials on YouTube to learn how the framework is used to build real-world apps.
- Read the codebase of open-source apps using the framework, and learn how they used it.
While each option has pros and cons, they don’t address the question: what is enough? This is what this article series answers for the Remix web framework.
In this article series, we’ll build a real-world todo app with Remix. And, by the end of the series, you’ll have learned 80% of the Remix concepts you’ll use daily to build real-world apps. For the other 20%, you should consult the doctor (i.e. the docs 😉).
Series roadmap
The goal of the series is to teach you everything about Remix that you’ll use on a daily basis. To ensure you can follow this series at a good pace, it’s broken down into seven parts.
Breakdown
- Part 1 - Building the app layout and structure
- Part 2 - Loading data into components and handling mutations with form
- Part 3 - Multiple forms with single button and concurrent mutations
- Part 4 - Pending UI
- Part 5 - Implementing a theme switcher
- Part 6 - Deploying the app
- Part 7 - Integrating a database and adding authentication
Technologies in use
- Remix as the full-stack web framework
- TypeScript for type safety
- Tailwind CSS for styling the app
- MongoDB as the database
- Render for deploying the app
Prerequisites
This series assumes you have a basic understanding of HTML, CSS, JavaScript, and React.js. For your development environment, it assumes you have Node.js and Git installed. If not, I recommend familiarizing yourself with and installing these technologies before proceeding.
Generating the Remix app
There are three ways to initialize a Remix project:
-
From the
create-remixCLI with the--templateflag. You provide a template or stack from the official or community ones. Templates are minimal starting points to get you up and running. Stacks are templates that are more complete and closer to production-ready architectures. -
From the
create-remixCLI without the--templateflag. You get a basic template using the built-in Remix App Server. The Remix App Server is a production-ready, but basic Node.js server built with Express. -
From scratch where you set up everything yourself. You install the runtime and development dependencies and set up the necessary configurations.
If you’re a complete beginner to Remix, you should initialize from scratch. This
will help you understand everything the create-remix CLI does to set up your
project. I’ve written an article on
how to set up a Remix project from scratch,
so give it a read if you need to.
Once you understand how things work, you should initialize using a template. It’s the easiest and fastest way to get your Remix app started and ready to deploy, saving you time. If the template doesn’t fully meet your needs, you can customize the initialization or modify the generated project.
For this app, the basic template is enough to get started. Run the following command in your terminal to generate a Remix project:
npx create-remix@latestOnce completed, open the project in your code editor. Then, run the following command to start the development server:
npm run devThat’s it! You’re ready to start building.
Building the app layout and structure
Before writing any code, let’s look at a sketch of the UI we’ll building.
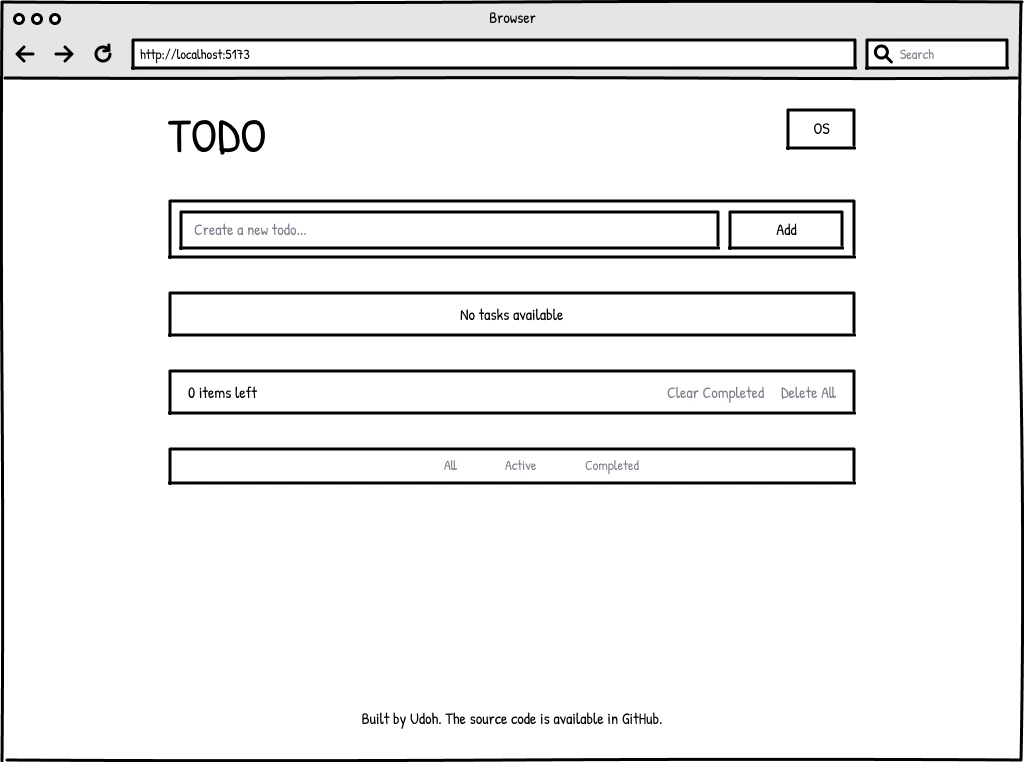
A todo app helps you manage a list of tasks you want to complete. While the UI might seem minimalistic, it covers the essential features every todo app should have:
- Ability to add tasks
- View all tasks, including when they were added and completed
- Mark tasks as completed
- Edit tasks to correct errors
- Delete tasks no longer needed
- Clear completed tasks
- Delete all tasks at once
- View only active or completed tasks
The app is minimalistic but not simplistic.
To start, delete all the code from tailwind.config.ts and replace it with the
following:
import type { Config } from "tailwindcss";
export default { content: ["./app/**/{**,.client,.server}/**/*.{js,jsx,ts,tsx}"], theme: { extend: { fontFamily: { system: [ "-apple-system", "BlinkMacSystemFont", "Segoe UI", "Roboto", "Oxygen", "Ubuntu", "Cantarell", "Open Sans", "Helvetica Neue", "sans-serif", "Apple Color Emoji", "Twemoji Mozilla", "Segoe UI Emoji", "Segoe UI Symbol", "Noto Color Emoji", "EmojiOne Color", "Android Emoji", ], }, }, }, plugins: [],} satisfies Config;Then, delete all the code from app/tailwind.css and replace it with the
following:
@tailwind base;@tailwind components;@tailwind utilities;Next, delete all the code from app/root.tsx and replace it with the following:
import { Links, Meta, Outlet, Scripts, ScrollRestoration,} from "@remix-run/react";
import "./tailwind.css";
export function Layout({ children }: { children: React.ReactNode }) { return ( <html lang="en" className="font-system bg-white/90 antialiased dark:bg-gray-900" > <head> <meta charSet="utf-8" /> <meta name="viewport" content="width=device-width, initial-scale=1" /> <Meta /> <Links /> </head> <body className="flex min-h-screen max-w-[100vw] flex-col overflow-x-hidden bg-gradient-to-r from-[#00fff0] to-[#0083fe] px-4 py-8 text-black dark:from-[#8E0E00] dark:to-[#1F1C18] dark:text-white"> {children} <ScrollRestoration /> <Scripts /> </body> </html> );}
export default function App() { return <Outlet />;}Finally, delete all the code from app/routes/_index.tsx and replace it with
the following:
import type { MetaFunction } from "@remix-run/node";import { Link } from "@remix-run/react";
export const meta: MetaFunction = () => { return [ { title: "Todo App" }, { name: "description", content: "A minimalistic todo app built with Remix.", }, ];};
export default function Home() { const tasks: string[] = [];
return ( <div className="flex flex-1 flex-col md:mx-auto md:w-[720px]"> <header className="mb-12 flex items-center justify-between"> <h1 className="text-4xl font-extrabold tracking-tight lg:text-5xl"> TODO </h1> <select className="appearance-none rounded-3xl border border-gray-200 bg-gray-50 px-4 py-2 dark:border-gray-700 dark:bg-gray-900"> <option>System</option> <option>Light</option> <option>Dark</option> </select> </header>
<main className="flex-1 space-y-8"> <form className="rounded-full border border-gray-200 bg-white/90 shadow-md dark:border-gray-700 dark:bg-gray-900"> <fieldset className="flex items-center gap-2 p-2 text-sm"> <input type="text" name="description" placeholder="Create a new todo..." required className="flex-1 rounded-full border-2 border-gray-200 px-3 py-2 text-sm font-bold text-black dark:border-white/50" /> <button className="rounded-full border-2 border-gray-200/50 bg-gradient-to-tl from-[#00fff0] to-[#0083fe] px-3 py-2 text-base font-black transition hover:scale-105 hover:border-gray-500 sm:px-6 dark:border-white/50 dark:from-[#8e0e00] dark:to-[#1f1c18] dark:hover:border-white"> Add </button> </fieldset> </form>
<div className="rounded-3xl border border-gray-200 bg-white/90 px-4 py-2 dark:border-gray-700 dark:bg-gray-900"> {tasks.length > 0 ? ( <ul> {tasks.map((task) => ( <li key={task}>{task}</li> ))} </ul> ) : ( <p className="text-center leading-7">No tasks available</p> )} </div>
<div className="rounded-3xl border border-gray-200 bg-white/90 px-4 py-2 dark:border-gray-700 dark:bg-gray-900"> <div className="flex items-center justify-between gap-4 text-sm"> <p className="text-center leading-7"> {tasks.length} {tasks.length === 1 ? "item" : "items"} left </p> <div className="flex items-center gap-4"> <button className="text-red-400 transition hover:text-red-600"> Clear Completed </button> <button className="text-red-400 transition hover:text-red-600"> Delete All </button> </div> </div> </div>
<div className="rounded-3xl border border-gray-200 bg-white/90 px-4 py-2 dark:border-gray-700 dark:bg-gray-900"> <div className="flex items-center justify-center gap-12 text-sm"> <button aria-label="View all tasks" className="opacity-50 transition hover:opacity-100" > All </button> <button aria-label="View active tasks" className="opacity-50 transition hover:opacity-100" > Active </button> <button aria-label="View completed" className="opacity-50 transition hover:opacity-100" > Completed </button> </div> </div> </main>
<footer className="mt-12"> <p className="text-center text-sm leading-loose"> Built by{" "} <Link to="https://udohjeremiah.com" target="_blank" rel="noopener noreferrer" className="relative font-medium text-white after:absolute after:-bottom-0.5 after:left-0 after:h-[1px] after:w-0 after:bg-white after:transition-all after:duration-300 hover:after:w-full dark:text-blue-500 dark:after:bg-blue-500" > Udoh </Link> . The source code is available on{" "} <Link to="https://github.com/udohjeremiah/remix-todo-app" target="_blank" rel="noopener noreferrer" className="relative font-medium text-white after:absolute after:-bottom-0.5 after:left-0 after:h-[1px] after:w-0 after:bg-white after:transition-all after:duration-300 hover:after:w-full dark:text-blue-500 dark:after:bg-blue-500" > GitHub </Link> . </p> </footer> </div> );}When you visit http://localhost:5173, you should see a layout similar to the sketch, but with actual colors and animations.
Conclusion
In this part of the series, you’ve learned the different ways to generate a Remix app. You initialized a Remix app using a template, got it up and running, and updated it with the layout and structure of the todo app we’re building. You’ll build on this foundation as the series progresses.
In the next part, you’ll learn how data loading and mutations work in Remix. This will enable you to load tasks from a database and add new tasks. Stay tuned!