
Introduction
Creating a new web project—whether for learning, a hobby, freelance work, or a company—is a task you would often undertake as a developer. Not having a definitive system or guide to follow, can make this process inefficient and inconsistent. While a CLI (command line interface) that automatically scaffolds a project can be helpful, each project’s needs are unique, and relying solely on such tools may not always be the best approach. Understanding the processes involved in starting a project from scratch is valuable, as it would provide you with foundational knowledge that can be useful when creating a customized approach tailored to your project’s specific needs.
This article provides a step-by-step guide on initiating and configuring a new web project from scratch using the Remix web framework. While you might often use the CLI provided by a library or framework for initialization, this guide goes beyond that. It covers customizing your project setup to meet specific requirements, integrating various tools and practices for a streamlined development process, and applying best practices for version control, dependency management, and continuous integration.
Prerequisite
This article assumes you have a basic understanding of building websites using HTML, CSS, and JavaScript and are familiar with working in the terminal (or “command line”). If not, I recommend familiarizing yourself with these technologies before proceeding.
Version control
Version control is a system that manages changes to a project’s files over time. A major feature of version control is that it ensures any changes made to your project are trackable and reversible. As a solo developer, you may not see the need for version control when you’re not collaborating with other developers or your project isn’t open-source. But, the ability to track the changes you’ve made over time and reverse those changes to a previous version when needed makes it a worthwhile decision for every developer. Git is a popular version control system, and GitHub is a popular platform for hosting and managing Git repositories. Together, they make version control easy for developers.
Step 1: Create an empty Git repository
To create a Git repository, you need to have Git installed on your system. Run the following command in your terminal to check if Git is installed:
git -vIf the output indicates that git is an unknown command, refer to this
GitHub article on how to install Git.
Otherwise, run the following commands to create a new directory, replacing
setup-web-project with your project’s name, and initialize it as a Git
repository:
mkdir setup-web-projectcd setup-web-projectgit initNow, make your first commit:
echo "# setup-web-project" >> README.mdgit add README.mdgit commit -m "First commit"Your setup-web-project directory structure should now look like this:
.└── README.mdStep 2: Create a GitHub repository and connect it to your local repository
To create a repository on GitHub, you need a GitHub account.
Create a GitHub account if you don’t have one yet.
Now, create a new GitHub repository named setup-web-project. Refer to this
GitHub article on creating a new repository
if you need help.
After creating your new repository, your GitHub repository page should show a quick setup screen:
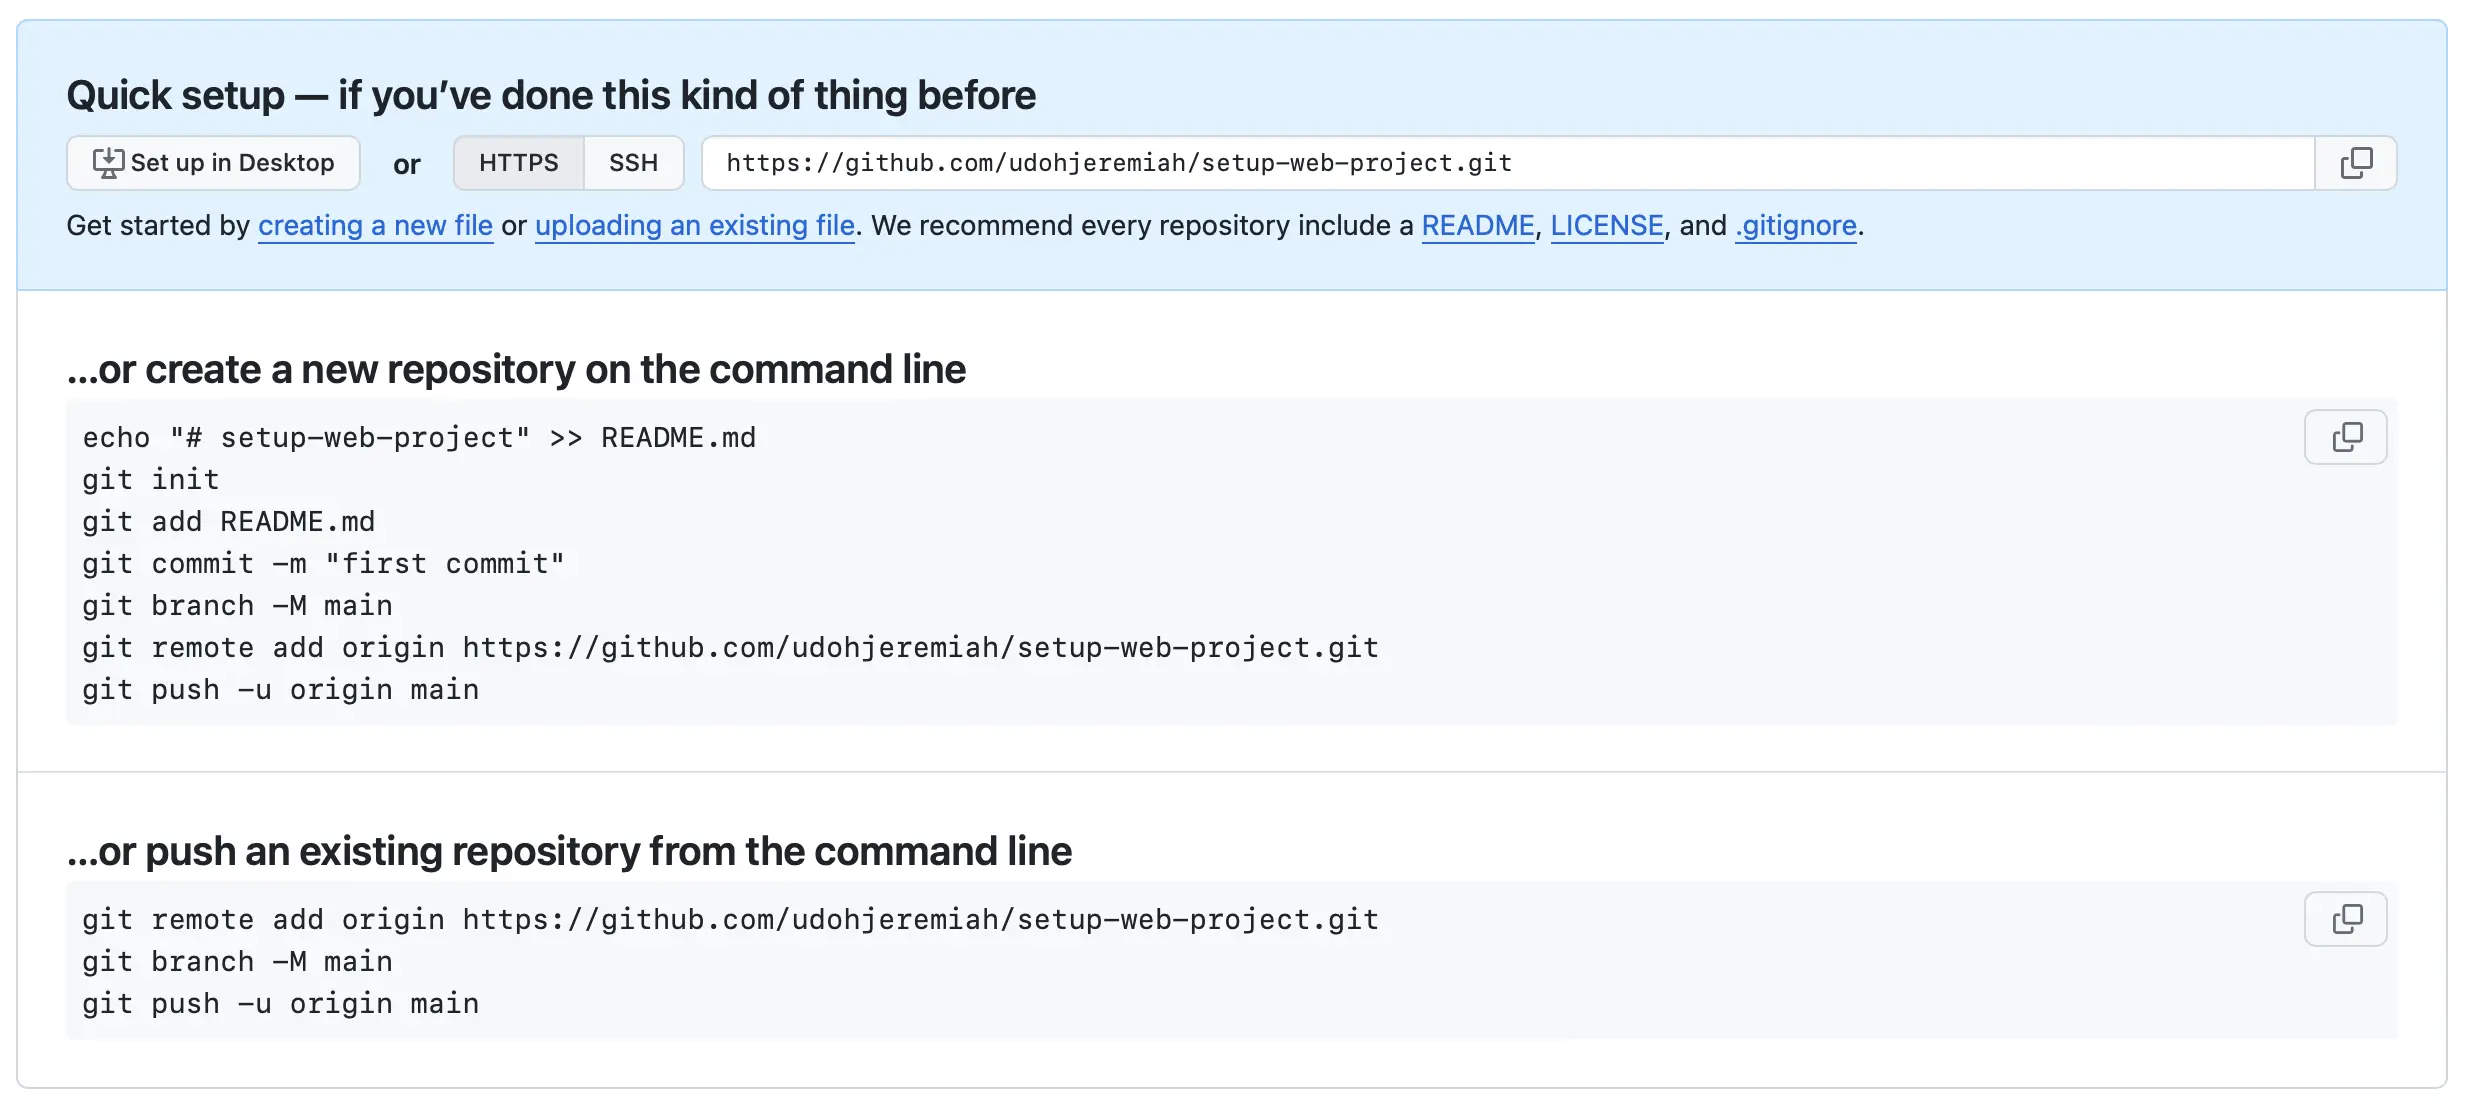
Copy and run the command under
…or push an existing repository from the command line. The code should
look like this, replacing udohjeremiah with your GitHub username:
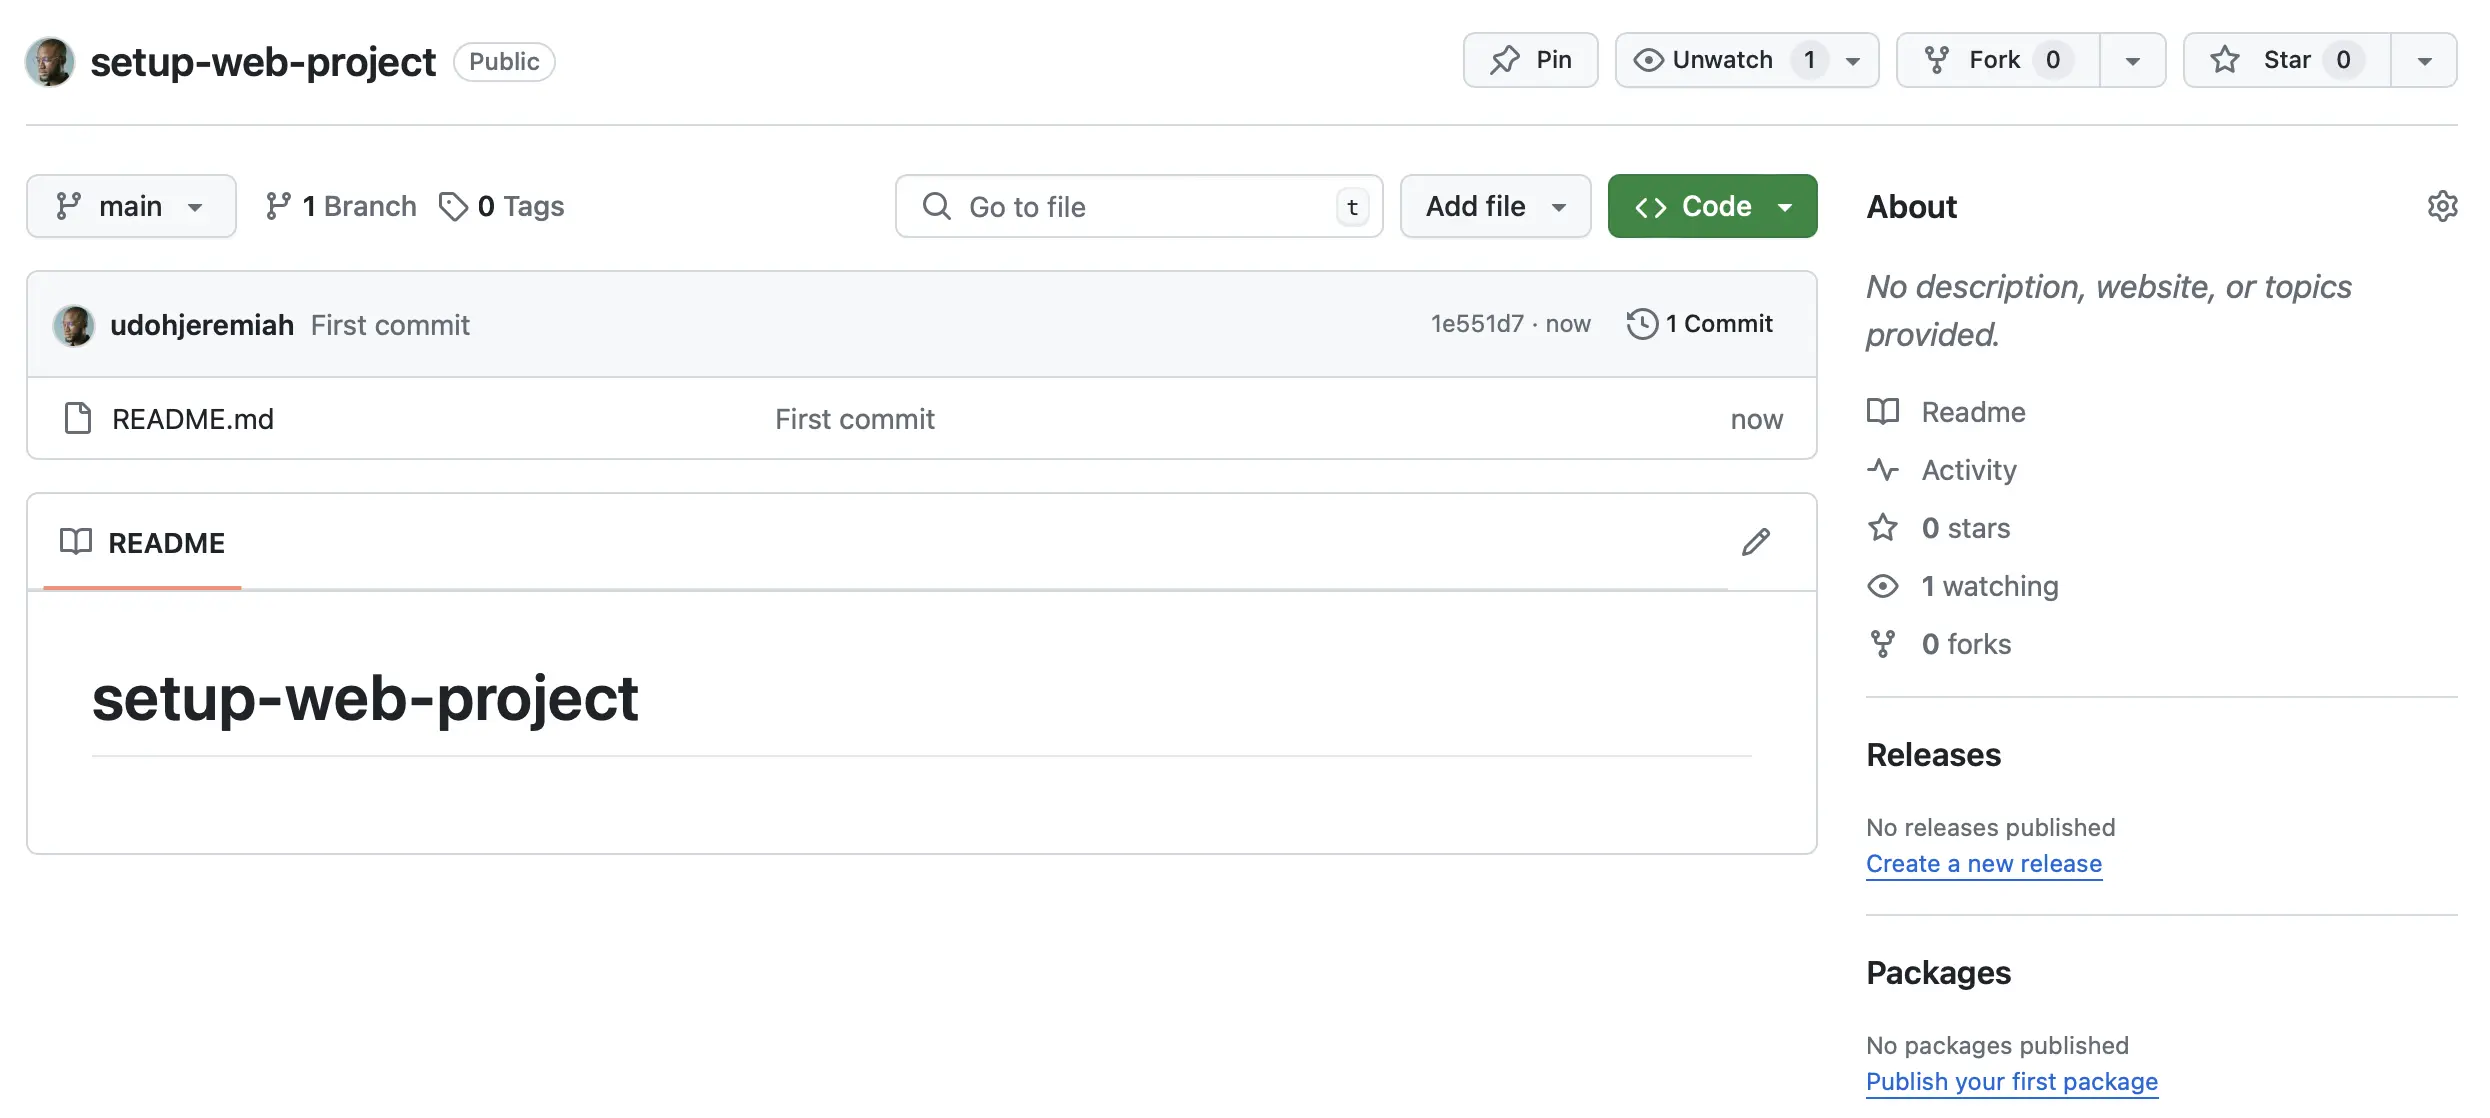
git remote add origin https://github.com/udohjeremiah/setup-web-project.gitgit branch -M maingit push -u origin mainAfter running the commands successfully, refresh the page of your repository on GitHub. The screen should now display the contents of your repository:
JavaScript runtime and package manager
A JavaScript runtime is an environment that allows JavaScript to be executed outside the browser, providing the necessary tools and APIs. The most well-known JavaScript runtime is Node.js. A package manager automates installing, updating, configuring, and managing software packages. npm is the default package manager for Node.js applications. With Node.js, developers can use JavaScript outside the browser, and npm enables them to publish their packages or install packages created by others from the npm registry, facilitating code reuse and sharing within the developer community.
Step 3: Initialize your Git repository as a new npm package
To initialize an npm package, you need to have Node.js and the npm CLI installed on your system. Run the following commands in your terminal to check if Node.js and the npm CLI are installed:
node -vnpm -vIf the output indicates that node or npm is an unknown command, refer to
this
npm article on installing Node.js and npm.
Otherwise, run the following command to initialize your Git repository as a new
npm package:
npm init -yAfter running the command successfully, a new file named package.json will be
created in your setup-web-project directory. The default content of the file
will look like this:
{ "name": "setup-web-project", "version": "1.0.0", "description": "", "main": "index.js", "scripts": { "test": "echo \"Error: no test specified\" && exit 1" }, "keywords": [], "author": "", "license": "ISC"}The npm init -y command initializes a new npm package by creating a
package.json file with default values. Since this is a web project rather than
a typical npm package for others to install, you should edit the package.json
file as follows:
{ "name": "setup-web-project", "private": true, "sideEffects": false, "type": "module", "scripts": {}, "engines": { "node": ">=20.0.0" }}Your setup-web-project directory structure should now look like this:
.├── README.md└── package.jsonFinally, stage, commit, and push your changes to GitHub with the following commands:
git add -Agit commit -m "Initialize npm package"git push originDependencies and development dependencies in npm
Dependencies are packages that a project needs to run in production. These are
essential for the project to function properly when it’s deployed. They are
installed with the command npm install <package-name> and listed under the
"dependencies" section in the package.json file. Development dependencies
are packages only needed during the development phase, as they are not required
for the application to run in production. They are installed with the command
npm install -D <package-name> and listed under the "devDependencies" section
in the package.json file.
Step 4: Install the runtime dependencies for a Remix app
Run the following command to install the dependencies for a Remix app:
npm install @remix-run/node @remix-run/react @remix-run/serve isbot@4 react react-domDid you notice that your setup-web-project directory now contains a
package-lock.json file and a node_modules directory you did not create? The
package-lock.json file is automatically generated to lock the versions of
installed packages, ensuring consistent installs. The node_modules directory,
also automatically added by npm, contains all project dependencies and can
become very large. Therefore, it is unnecessary to include it in the GitHub
repository. Dependencies can be reinstalled using the project’s package.json
file with npm install.
To prevent a file or directory from being tracked by Git and pushed to GitHub
from your local repository, you can ignore it by adding it to a .gitignore
file. Run the following command to create a .gitignore file and ignore the
node_modules directory:
echo "node_modules" >> .gitignoreYour setup-web-project directory structure should now look like this:
.├── README.md├── .gitignore├── node_modules│ └── ... (contains more directories and files)├── package-lock.json└── package.jsonFinally, stage, commit, and push your changes to GitHub with the following commands:
git add -Agit commit -m "Install runtime dependencies"git push originStep 5: Install and set up the build tools for a Remix app
Run the following command to install the build tools for a Remix app:
npm install -D @remix-run/dev viteSince Remix uses Vite to compile your application,
providing a Vite config file with the Remix Vite
plugin from @remix-run/dev is necessary.
Run the following command to create a vite.config.ts file:
touch vite.config.tsCopy the following code into the vite.config.ts file:
import { vitePlugin as remix } from "@remix-run/dev";import { defineConfig } from "vite";
export default defineConfig({ plugins: [remix()],});Add the following scripts to the "scripts" property in the package.json
file:
{ // ...existing configurations "scripts": { "build": "remix vite:build", "dev": "remix vite:dev", "start": "remix-serve ./build/server/index.js" } // ...existing configurations}npm run dev: is used to start the development server.npm run build: is used to build the app for production.npm run start: is used to start a production server.
Update your .gitignore file to ignore the build directory created whenever
you run the command npm run build. This directory contains the highly
optimized production build for deployment and should not be included in your
GitHub repository:
node_modules
/buildYour setup-web-project directory structure should now look like this:
.├── README.md├── .gitignore├── node_modules│ └── ... (contains more directories and files)├── package-lock.json├── package.json└── vite.config.tsFinally, stage, commit, and push your changes to GitHub with the following commands:
git add -Agit commit -m "Install and setup build tools"git push originStep 6: Install and set up TypeScript for type safety
Run the following command to install TypeScript:
npm install -D typescriptRun the following command to create a tsconfig.json file to indicate that
setup-web-project is the root of a TypeScript project:
touch tsconfig.jsonCopy the code from
Remix’s tsconfig.json template
to the tsconfig.json file to specify the files to be included in the
compilation and the compiler options required to compile the project:
{ "include": [ "**/*.ts", "**/*.tsx", "**/.server/**/*.ts", "**/.server/**/*.tsx", "**/.client/**/*.ts", "**/.client/**/*.tsx" ], "compilerOptions": { "lib": ["DOM", "DOM.Iterable", "ES2022"], "types": ["@remix-run/node", "vite/client"], "isolatedModules": true, "esModuleInterop": true, "jsx": "react-jsx", "module": "ESNext", "moduleResolution": "Bundler", "resolveJsonModule": true, "target": "ES2022", "strict": true, "allowJs": true, "skipLibCheck": true, "forceConsistentCasingInFileNames": true, "baseUrl": ".", "paths": { "~/*": ["./app/*"] },
// Vite takes care of building everything, not tsc. "noEmit": true }}Install the type definitions for react and react-dom:
npm install -D @types/react @types/react-domInstall the vite-tsconfig-paths package to give Vite the ability to resolve
imports using TypeScript’s path mapping:
npm install -D vite-tsconfig-pathsUpdate your vite.config.ts file to add the vite-tsconfig-paths plugin:
import { vitePlugin as remix } from "@remix-run/dev";import { defineConfig } from "vite";import tsconfigPaths from "vite-tsconfig-paths";
export default defineConfig({ plugins: [remix(), tsconfigPaths()],});Add the typecheck script to the "scripts" property in the package.json
file:
{ // ...existing configurations "scripts": { "build": "remix vite:build", "dev": "remix vite:dev", "start": "remix-serve ./build/server/index.js", "typecheck": "bash -c \"tsc $* --noEmit\"" } // ...existing configurations}npm run typecheck: is used to check the type safety of the program, ensuring it’s free of type-related errors.
Your setup-web-project directory structure should now look like this:
.├── README.md├── .gitignore├── node_modules│ └── ... (contains more directories and files)├── package-lock.json├── package.json├── tsconfig.json└── vite.config.tsFinally, stage, commit, and push your changes to GitHub with the following commands:
git add -Agit commit -m "Install and set up typescript for type safety"git push originStep 7: Install and set up Tailwind CSS for styling
Run the following command to install Tailwind CSS and its peer dependencies:
npm install -D tailwindcss postcss autoprefixerRun the following command to generate tailwind.config.ts and
postcss.config.js files:
npx tailwindcss init --ts -pCopy the code from
Remix’s tailwind.config.ts template
into the tailwind.config.ts file to add the paths to all of your template
files:
import type { Config } from "tailwindcss";
export default { content: ["./app/**/{**,.client,.server}/**/*.{js,jsx,ts,tsx}"], theme: { extend: {}, }, plugins: [],} satisfies Config;Your setup-web-project directory should now look like this:
.├── README.md├── .gitignore├── node_modules│ └── ... (contains more directories and files)├── package-lock.json├── package.json├── postcss.config.js├── tailwind.config.ts├── tsconfig.json└── vite.config.tsFinally, stage, commit, and push your changes to GitHub with the following commands:
git add -Agit commit -m "Install and set up tailwindcss for styling"git push originStep 8: Create the root and index routes
In Remix, app/root.tsx is the root layout of your entire app and is called the
“Root Route.” It is the first component in the UI that renders, so it typically
contains the global layout for the page.
Run the following commands to create the Root Route:
mkdir apptouch app/root.tsxYou need a tailwind.css file inside the app directory. This file will
include the @tailwind directives for each of Tailwind’s layers.
Run the following command to create a tailwind.css file inside app:
touch app/tailwind.cssCopy the following code into the app/tailwind.css file:
@tailwind base;@tailwind components;@tailwind utilities;Copy the following code into the app/root.tsx file so that all other routes
will render inside the <Outlet />:
import { Links, Meta, Outlet, Scripts, ScrollRestoration,} from "@remix-run/react";
import "./tailwind.css";
export function Layout({ children }: { children: React.ReactNode }) { return ( <html lang="en"> <head> <meta charSet="utf-8" /> <meta name="viewport" content="width=device-width, initial-scale=1" /> <Links /> <Meta /> </head> <body> {children} <ScrollRestoration /> <Scripts /> </body> </html> );}
export default function App() { return <Outlet />;}In Remix, any JavaScript or TypeScript files in the app/routes directory will
become routes in your app. The filename maps to the route’s URL pathname
(app/routes/about.tsx matches the route /about, app/routes/contact.tsx
matches the route contact), except for _index.tsx, which serves as the
index route for the root route, matching the route /.
Run the following commands to create the index route for the root route:
mkdir app/routestouch app/routes/_index.tsxCopy the following code into the app/routes/_index.tsx file:
export default function Home() { return ( <div className="flex h-screen w-screen items-center justify-center px-5 py-24"> <div className="absolute inset-0 -z-10 h-full w-full items-center px-5 py-24 [background:radial-gradient(125%_125%_at_50%_10%,#000_40%,#63e_100%)]"></div>
<div className="flex max-w-2xl flex-col items-center space-y-6"> <div className="flex"> <span className="relative overflow-hidden rounded-full p-[1px]"> <span className="absolute inset-[-1000%] animate-[spin_2s_linear_infinite] bg-[conic-gradient(from_90deg_at_50%_50%,#171717_0%,#737373_50%,#171717_100%)]" /> <div className="select-none rounded-full bg-black px-3 py-1 text-xs font-medium leading-5 text-slate-200 backdrop-blur-xl"> I'm almost there </div> </span> </div>
<h2 className="text-center text-3xl font-medium text-gray-50 sm:text-6xl"> New project loading... </h2>
<p className="text-center text-lg leading-6 text-gray-200"> Setting up and customizing my new web project, integrating tools, and applying best practices for a smooth development process. Stay tuned for more updates! </p> </div> </div> );}Now, run the following command to start the dev server:
npm run devOpen http://localhost:5173 in your browser, and you should see a screen that looks like this:

Your setup-web-project directory structure should now look like this:
.├── README.md├── .gitignore├── app│ ├── root.tsx│ ├── routes│ │ └── _index.tsx│ └── tailwind.css├── node_modules│ └── ... (contains more directories and files)├── package-lock.json├── package.json├── postcss.config.js├── tailwind.config.ts├── tsconfig.json└── vite.config.tsFinally, stage, commit, and push your changes to GitHub with the following commands:
git add -Agit commit -m "Create the root and index routes"git push originStep 9: Install and set up ESLint for linting
Linting is analyzing code to catch potential errors and enforce coding standards. ESLint is the most popular linting tool for JavaScript, offering customizable rules for maintaining code quality and consistency.
Run the following command to install ESLint and React-specific plugins for ESLint:
npm install -D eslint eslint-plugin-import eslint-plugin-jsx-a11y eslint-plugin-react eslint-plugin-react-hooksRun the following command to install TypeScript-specific plugins:
npm install -D eslint-import-resolver-typescript @typescript-eslint/eslint-plugin @typescript-eslint/parserRun the following command to create a .eslintrc.cjs file for your ESLint
configuration:
touch .eslintrc.cjsCopy the code from
Remix’s .eslintrc.cjs template
into the eslintrc.cjs file:
/** * This is intended to be a basic starting point for linting in your app. * It relies on recommended configs out of the box for simplicity, but you can * and should modify this configuration to best suit your team's needs. */
/** @type {import('eslint').Linter.Config} */module.exports = { root: true, parserOptions: { ecmaVersion: "latest", sourceType: "module", ecmaFeatures: { jsx: true, }, }, env: { browser: true, commonjs: true, es6: true, }, ignorePatterns: ["!**/.server", "!**/.client"],
// Base config extends: ["eslint:recommended"],
overrides: [ // React { files: ["**/*.{js,jsx,ts,tsx}"], plugins: ["react", "jsx-a11y"], extends: [ "plugin:react/recommended", "plugin:react/jsx-runtime", "plugin:react-hooks/recommended", "plugin:jsx-a11y/recommended", ], settings: { react: { version: "detect", }, formComponents: ["Form"], linkComponents: [ { name: "Link", linkAttribute: "to" }, { name: "NavLink", linkAttribute: "to" }, ], "import/resolver": { typescript: {}, }, }, },
// Typescript { files: ["**/*.{ts,tsx}"], plugins: ["@typescript-eslint", "import"], parser: "@typescript-eslint/parser", settings: { "import/internal-regex": "^~/", "import/resolver": { node: { extensions: [".ts", ".tsx"], }, typescript: { alwaysTryTypes: true, }, }, }, extends: [ "plugin:@typescript-eslint/recommended", "plugin:import/recommended", "plugin:import/typescript", ], },
// Node { files: [".eslintrc.cjs"], env: { node: true, }, }, ],};Add the following scripts to the "scripts" property in the package.json
file:
{ // ...existing configurations "scripts": { "build": "remix vite:build", "dev": "remix vite:dev", "lint": "eslint --ignore-path .gitignore --cache --cache-location ./node_modules/.cache/eslint .", "lint:fix": "eslint --fix --ignore-path .gitignore --cache --cache-location ./node_modules/.cache/eslint .", "start": "remix-serve ./build/server/index.js", "typecheck": "bash -c \"tsc $* --noEmit\"" } // ...existing configurations}-
npm run lint: is used to check the program for linting errors, ensuring it adheres to ESLint’s style. -
npm run lint:fix: is used to automatically fix linting errors in the program that ESLint can resolve.
Your setup-web-project directory structure should now look like this:
.├── README.md├── .eslintrc.cjs├── .gitignore├── app│ ├── root.tsx│ ├── routes│ │ └── _index.tsx│ └── tailwind.css├── node_modules│ └── ... (contains more directories and files)├── package-lock.json├── package.json├── postcss.config.js├── tailwind.config.ts├── tsconfig.json└── vite.config.tsFinally, stage, commit, and push your changes to GitHub with the following commands:
git add -Agit commit -m "Install and setup eslint for linting"git push originStep 10: Install and set up Prettier for code formatting
Code formatting involves organizing code consistently according to predefined style rules, improving readability and maintainability. Prettier is the most popular code formatting tool for JavaScript. It automatically formats code to ensure a consistent style across projects.
Run the following command to install Prettier:
npm install -D prettierPrettier is an opinionated code formatter. It applies a default set of rules to your code regardless of any configuration. But, it does not handle code sorting out of the box. To enable this feature, you need to use a plugin.
Run the following command to install the Tailwind CSS plugin that sorts its utility classes and Trivago’s plugin that sorts import declarations:
npm install -D prettier-plugin-tailwindcss @trivago/prettier-plugin-sort-importsRun the following command to create a prettier.config.js file for your
Prettier configuration:
touch prettier.config.jsCopy the following code into the prettier.config.js file:
/** @type {import('prettier').Options} */export default { "importOrder": [ "^~/components/(.*)$", "^~/hooks/(.*)$", "^~/lib/(.*)$", "^~/routes/(.*)$", "^~/styles/(.*)$", "^~/utils/(.*)$", "^[./]" ], "importOrderSeparation": true, "importOrderSortSpecifiers": true,
"plugins": [ "@trivago/prettier-plugin-sort-imports", "prettier-plugin-tailwindcss" ]};Add the following scripts to the "scripts" property in the package.json
file:
{ // ...existing configurations "scripts": { "build": "remix vite:build", "dev": "remix vite:dev", "format": "prettier --check --ignore-path .gitignore .", "format:fix": "prettier --write --ignore-path .gitignore .", "lint": "eslint --ignore-path .gitignore --cache --cache-location ./node_modules/.cache/eslint .", "lint:fix": "eslint --fix --ignore-path .gitignore --cache --cache-location ./node_modules/.cache/eslint .", "start": "remix-serve ./build/server/index.js", "typecheck": "bash -c \"tsc $* --noEmit\"" } // ...existing configurations}-
npm run format: is used to check the code format of the program, ensuring it adheres to Prettier’s style. -
npm run format:fix: is used to automatically fix code formatting errors in the program.
Your setup-web-project directory structure should now look like this:
.├── README.md├── .eslintrc.cjs├── .gitignore├── app│ ├── root.tsx│ ├── routes│ │ └── _index.tsx│ └── tailwind.css├── node_modules│ └── ... (contains more directories and files)├── package-lock.json├── package.json├── postcss.config.js├── prettier.config.js├── tailwind.config.ts├── tsconfig.json└── vite.config.tsFinally, stage, commit, and push your changes to GitHub with the following commands:
git add -Agit commit -m "Install and setup prettier for code formatting"git push originStep 11: Install and set up git hooks
Git hooks are scripts that Git executes automatically before or after a particular event (such as commit, push, merge, etc) occurs in a Git repository. They are used to automate tasks, enforce policies, ensure consistency, etc. In the JavaScript ecosystem, husky is a popular tool that makes managing Git hooks easy, and lint-staged is a popular tool used to run linters on files staged for commit. Together, husky and lint-staged can be used to automate tasks that run before the commit process.
Run the following command to install husky and lint-staged:
npm i -D husky lint-stagedUpdate the package.json file to include the "lint-staged" configuration as
follows:
{ // ...existing configurations "lint-staged": { "*": "npm run format", "*.{js,ts,jsx,tsx}": ["npm run lint", "npm run typecheck"], "*.{html,css,js,ts,md,jsx,tsx,mdx}": "npm run build ." }}Now, run the following command to set up husky in the project:
npx husky initAfter running the command successfully, a .husky directory with a pre-commit
file will be created, and the prepare script will be added to the "scripts"
property in the package.json file:
{ // ...existing configurations "scripts": { "build": "remix vite:build", "dev": "remix vite:dev", "format": "prettier --check --ignore-path .gitignore .", "format:fix": "prettier --write --ignore-path .gitignore .", "lint": "eslint --ignore-path .gitignore --cache --cache-location ./node_modules/.cache/eslint .", "lint:fix": "eslint --fix --ignore-path .gitignore --cache --cache-location ./node_modules/.cache/eslint .", "start": "remix-serve ./build/server/index.js", "typecheck": "bash -c \"tsc $* --noEmit\"", "prepare": "husky" } // ...existing configurations}Update the .husky/pre-commit file to:
npx lint-stagedYour setup-web-project directory structure should now look like this:
.├── README.md├── .eslintrc.cjs├── .gitignore├── .husky│ ├── _│ │ └── ... (contains more directories and files)│ └── pre-commit├── app│ ├── root.tsx│ ├── routes│ │ └── _index.tsx│ └── tailwind.css├── node_modules│ └── ... (contains more directories and files)├── package-lock.json├── package.json├── postcss.config.js├── prettier.config.js├── tailwind.config.ts├── tsconfig.json└── vite.config.tsNow, stage and commit your changes with the following commands:
git add -Agit commit -m "Install and setup git hooks for pre-commit checks"Oops 😬, we encountered an error. I apologize for the inconvenience. You just saw the power of Git hooks in action. Currently, our codebase does not adhere to Prettier’s style. Although we have set up Prettier, we have not yet formatted the codebase. So, when attempting to commit our changes, the pre-commit Git hook is automatically triggered before the commit process. The specified tests in the Git hook failed, leading to the interruption of the commit process:
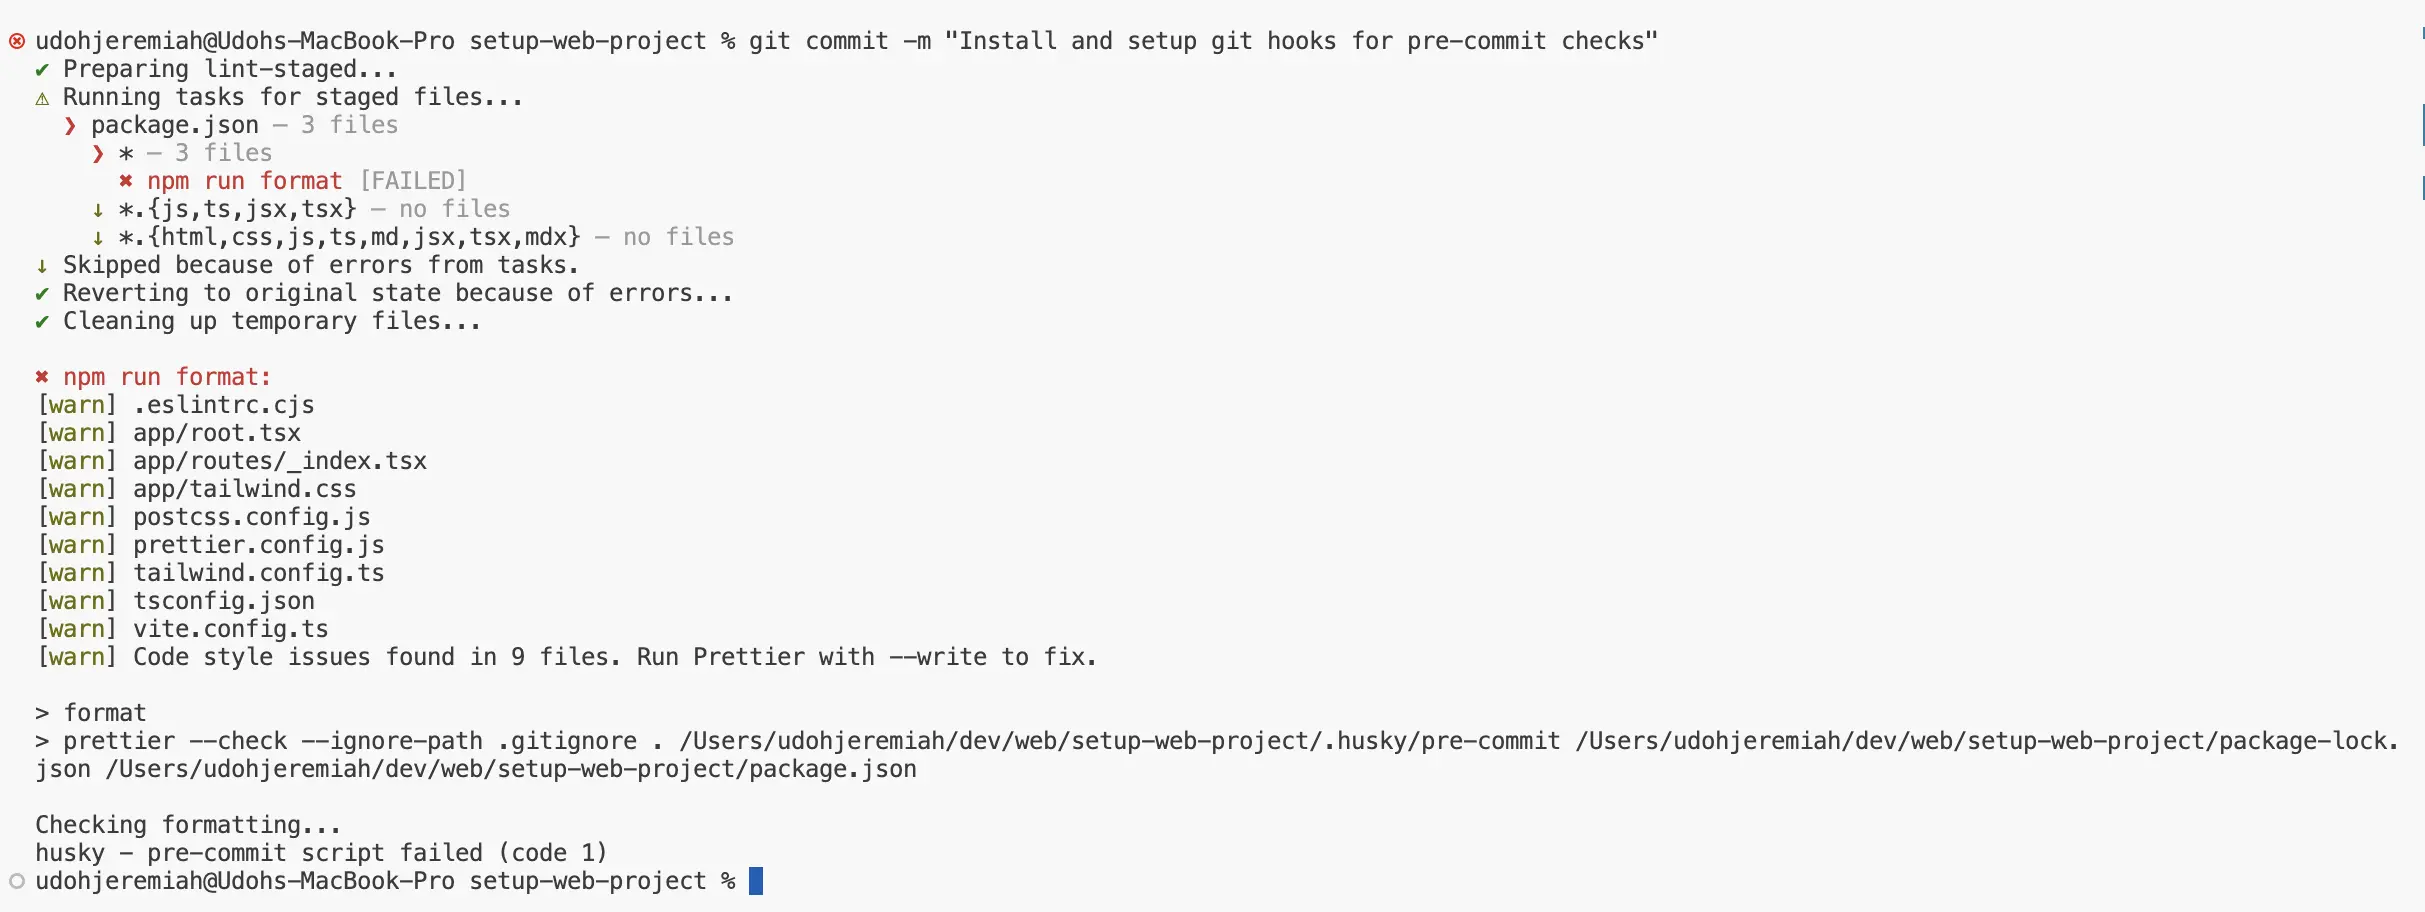
As indicated in the error message (see photo above), we can use the --write
flag with Prettier to fix the code style issues automatically. We’ve already
configured a script for this in our package.json.
Run the following command to format the codebase to adhere to Prettier’s style:
npm run format:fixAfter successfully running the command, Prettier will format our files, making changes to the ones we staged last time. Therefore, we should stage the modifications and attempt to commit again:
git add -Agit commit -m "Install and setup git hooks for pre-commit checks"Once again 😩! The commit process is interrupted but for good reasons. This time it’s not Prettier, but ESLint that found a problem with our code:
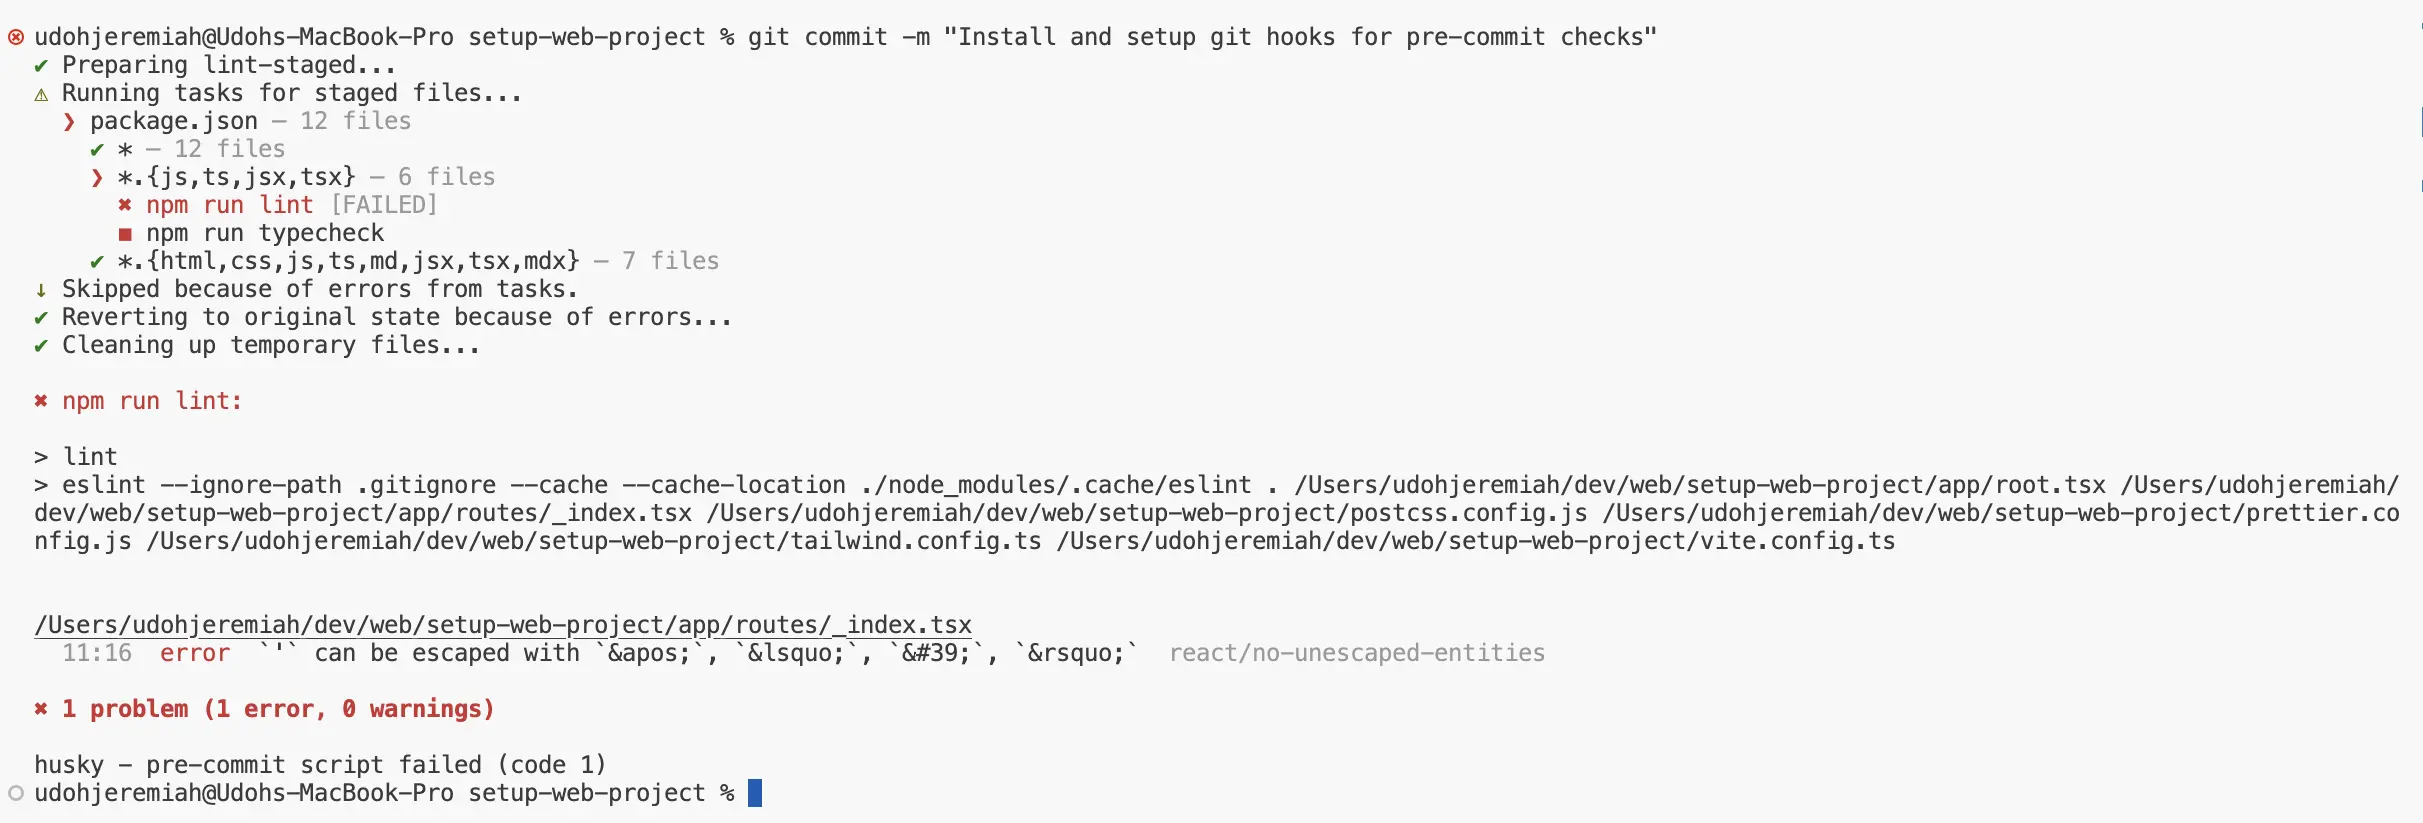
Again, the error message tells us how to fix the issues. Go into the
app/routes/_index.tsx file and change all occurrences of ' with '.
Also remember, to run npm run format:fix after making these changes, to make
sure the codebase adheres to Prettier’s style.
Run the following commands to stage the changes and attempt to commit again:
git add -Agit commit -m "Install and setup git hooks for pre-commit checks"Hurray! 🎉 It worked. With that done, run the following command to push your changes to GitHub:
git push originContinuous integration and dependency management
Continuous integration (CI) is a software development practice where developers frequently commit code changes to a central repository. Each commit is automatically checked to ensure it is fit for production by building the project and running tests to catch errors quickly. Dependency management involves handling the packages that your project depends on. It includes tasks such as installing, updating, and resolving dependencies to ensure your project has all the necessary components to function correctly. GitHub provides built-in CI and dependency management capabilities through GitHub Actions and Dependabot.
Step 12: Setup CI and dependency management with GitHub
For GitHub to discover any GitHub Actions workflows in your repository, you must
save the workflow files in a directory called .github/workflows. You can name
the workflow file anything, but it must have a .yml or .yaml extension.
Run the following commands to create the .github/workflows directory:
mkdir .githubmkdir .github/workflowsPreviously, you added a pre-commit Git hook to your repository to ensure that
your code is correctly formatted, free of linting or type-related errors and
that the build process completes successfully before committing any staged
files. Additionally, you can ensure these tests run whenever a pull request is
opened or code is pushed to the main branch on your hosted GitHub repository
using CI. GitHub will run the CI tests and provide the results in the pull
request, so you can see whether the changes in your branch introduce any errors.
When all CI tests in a workflow pass, the changes you pushed are ready to be
merged. If a test fails, one of your changes may have caused the failure.
Run the following command to create a ci.yml file in the .github/workflows
directory:
touch .github/workflows/ci.ymlCopy the following code into the .github/workflows/ci.yml file:
# The name of the workflowname: CI
# Events that will cause the workflow to runon: # When a pull request is opened or reopened or when the head branch of the pull request is updated pull_request: branches: - main # When you push a commit or tag, or when you create a repository from a template push: branches: - main # When a workflow is triggered manually, using the GitHub API, GitHub CLI, or GitHub browser interface workflow_dispatch:
# Ensure only one workflow runs at a time for each pull request or push to the main branchconcurrency: group: ${{ github.workflow }}-${{ github.event.pull_request.number || github.ref }} cancel-in-progress: true
# A workflow run is made up of one or more jobs, which run in parallel by defaultjobs: build: # The unique identifier for the job name: Build # The name for the job, which is displayed in the GitHub UI runs-on: ${{ matrix.os }} # The type of machine to run the job on strategy: # Defines a matrix of different job configurations matrix: os: [ubuntu-latest] node_version: ["20.x"] # A job contains a sequence of tasks called steps steps: - name: Check out repository uses: actions/checkout@v4
- name: Set up Node.js and cache dependencies uses: actions/setup-node@v4 with: node-version: ${{ matrix.node-version }} cache: "npm" cache-dependency-path: "**/package-lock.json"
- name: Install dependencies run: npm ci
- name: Check code format with Prettier run: npm run format
- name: Check code for linting errors with ESLint run: npm run lint
- name: Type check with TypeScript run: npm run typecheck
- name: Build with Vite run: npm run buildDependabot creates pull requests to keep your dependencies secure and
up-to-date. To configure Dependabot to maintain your repository, you need a
Dependabot configuration file, dependabot.yml, stored in the .github
directory.
Run the following command to create the .github/dependabot.yml file:
touch .github/dependabot.ymlCopy the following code into the .github/dependabot.yml file:
version: 2
updates: # Enable version updates for github-actions - package-ecosystem: "github-actions" # Look for workflow files in the `.github/workflows` directory directory: "/" # Check for updates to GitHub Actions every week schedule: interval: "weekly" commit-message: # Prefix all commit messages with "github-actions: " prefix: "github-actions"
# Enable version updates for npm - package-ecosystem: "npm" # Look for `package.json` and lock files in the root directory directory: "/" # Check the npm registry for updates once a month schedule: interval: "monthly" # Include a list of updated dependencies # with a prefix determined by the dependency group commit-message: prefix: "npm" prefix-development: "npm dev" include: "scope" # Allow up to 10 open pull requests for npm dependencies open-pull-requests-limit: 10Your setup-web-project directory structure should now look like this:
.├── README.md├── .eslintrc.cjs├── .github│ ├── workflows│ │ └── ci.yml│ └── dependabot.yml├── .gitignore├── .husky│ ├── _│ │ └── ... (contains more directories and files)│ └── pre-commit├── app│ ├── root.tsx│ ├── routes│ │ └── _index.tsx│ └── tailwind.css├── node_modules│ └── ... (contains more directories and files)├── package-lock.json├── package.json├── postcss.config.js├── prettier.config.js├── tailwind.config.ts├── tsconfig.json└── vite.config.tsFinally, stage, commit, and push your changes to GitHub with the following commands:
git add -Agit commit -m "Setup CI and dependency management"git push originGit workflow
A Git workflow is a structured method for managing changes to a project’s source
code using Git. It defines how changes are proposed, reviewed, and integrated
into the project, ensuring work is done consistently and efficiently. Various
Git workflows exist, each tailored to different types of projects and teams. A
popular workflow for continuously deployed software, such as web applications,
is the GitHub Flow. GitHub
Flow is a simplified workflow that uses only feature branches and the main
branch. All changes are merged into the main branch via
pull requests, and the main branch
is continuously deployed in small, incremental updates as changes are merged
into it.
Step 13: Add a ruleset to the main branch
To require a pull request and status checks to pass before merging, follow these steps:
-
Refer to this GitHub article on creating a branch or tag ruleset for detailed instructions.
-
Complete the steps outlined in the article.
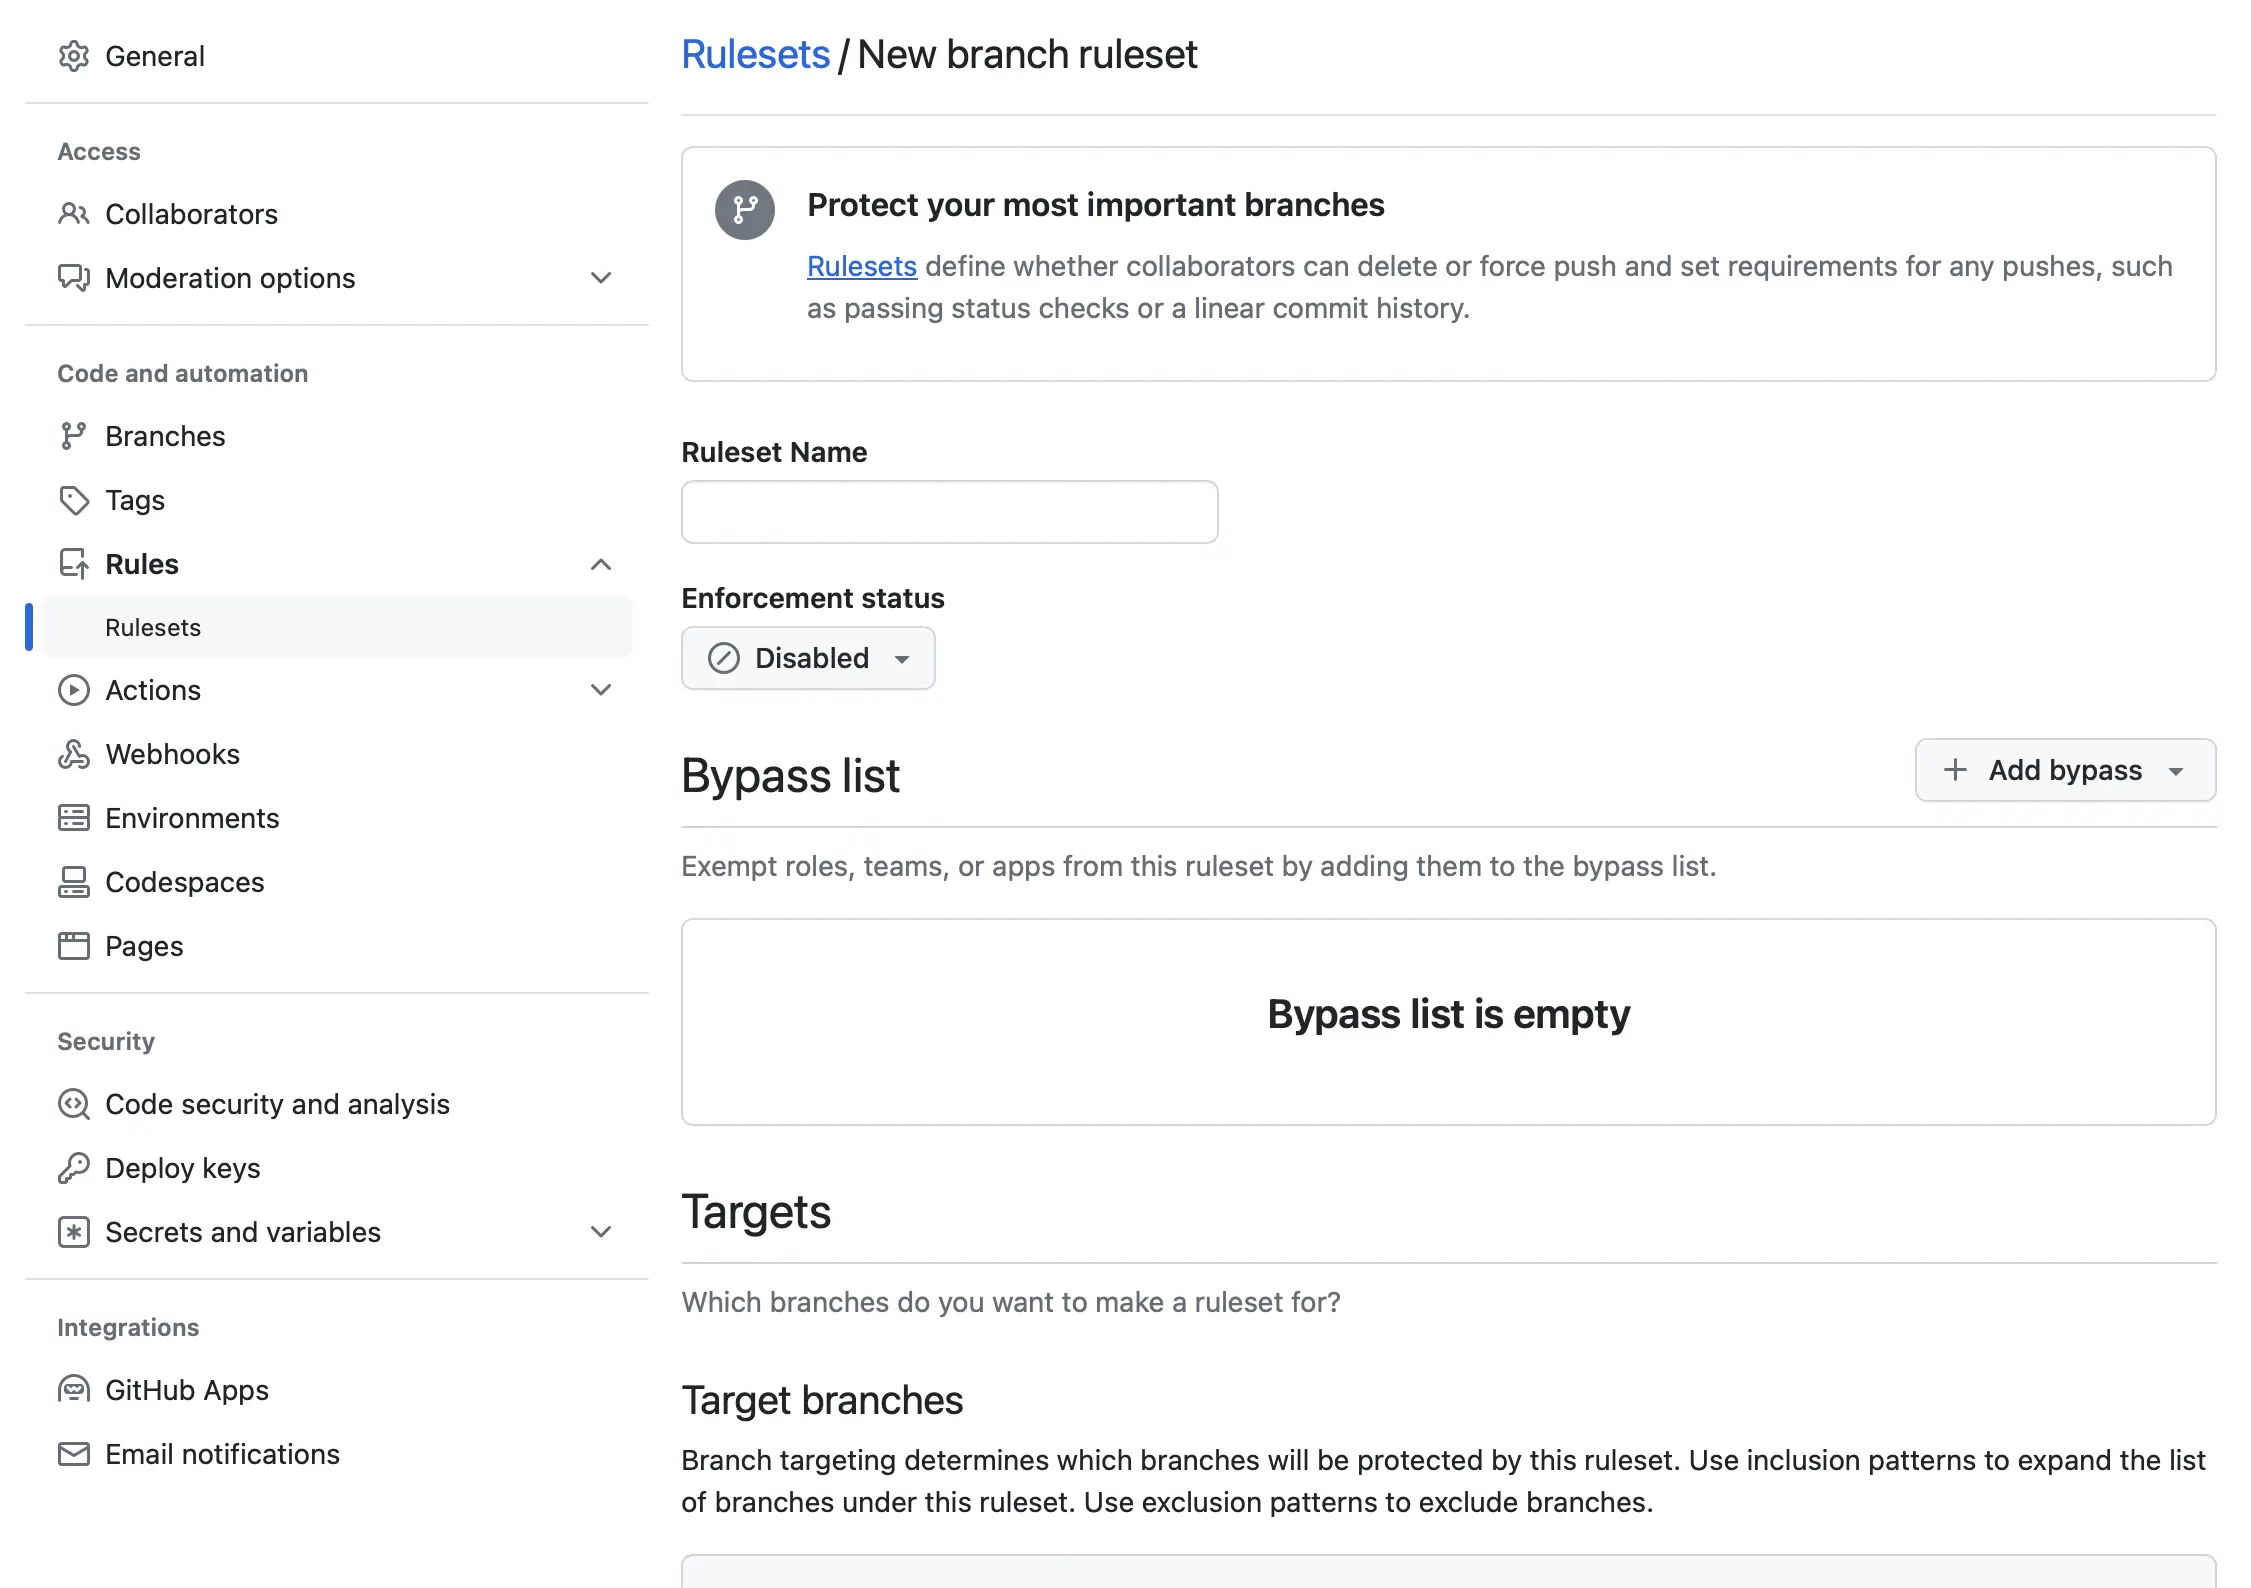
After completing the steps from the “Creating a branch or tag ruleset” section, you should see a screen that looks like this:
-
Under Ruleset Name, enter the value “GitHub Flow”.
-
Change the Enforcement status from “Disabled” to “Active”.
-
Under Target branches, click on the Add target button and select Include default branch.
-
Under Branch rules, check the following options:
- Require a pull request before merging
- Require status checks to pass
After clicking on Require status checks to pass, an additional settings will be displayed:
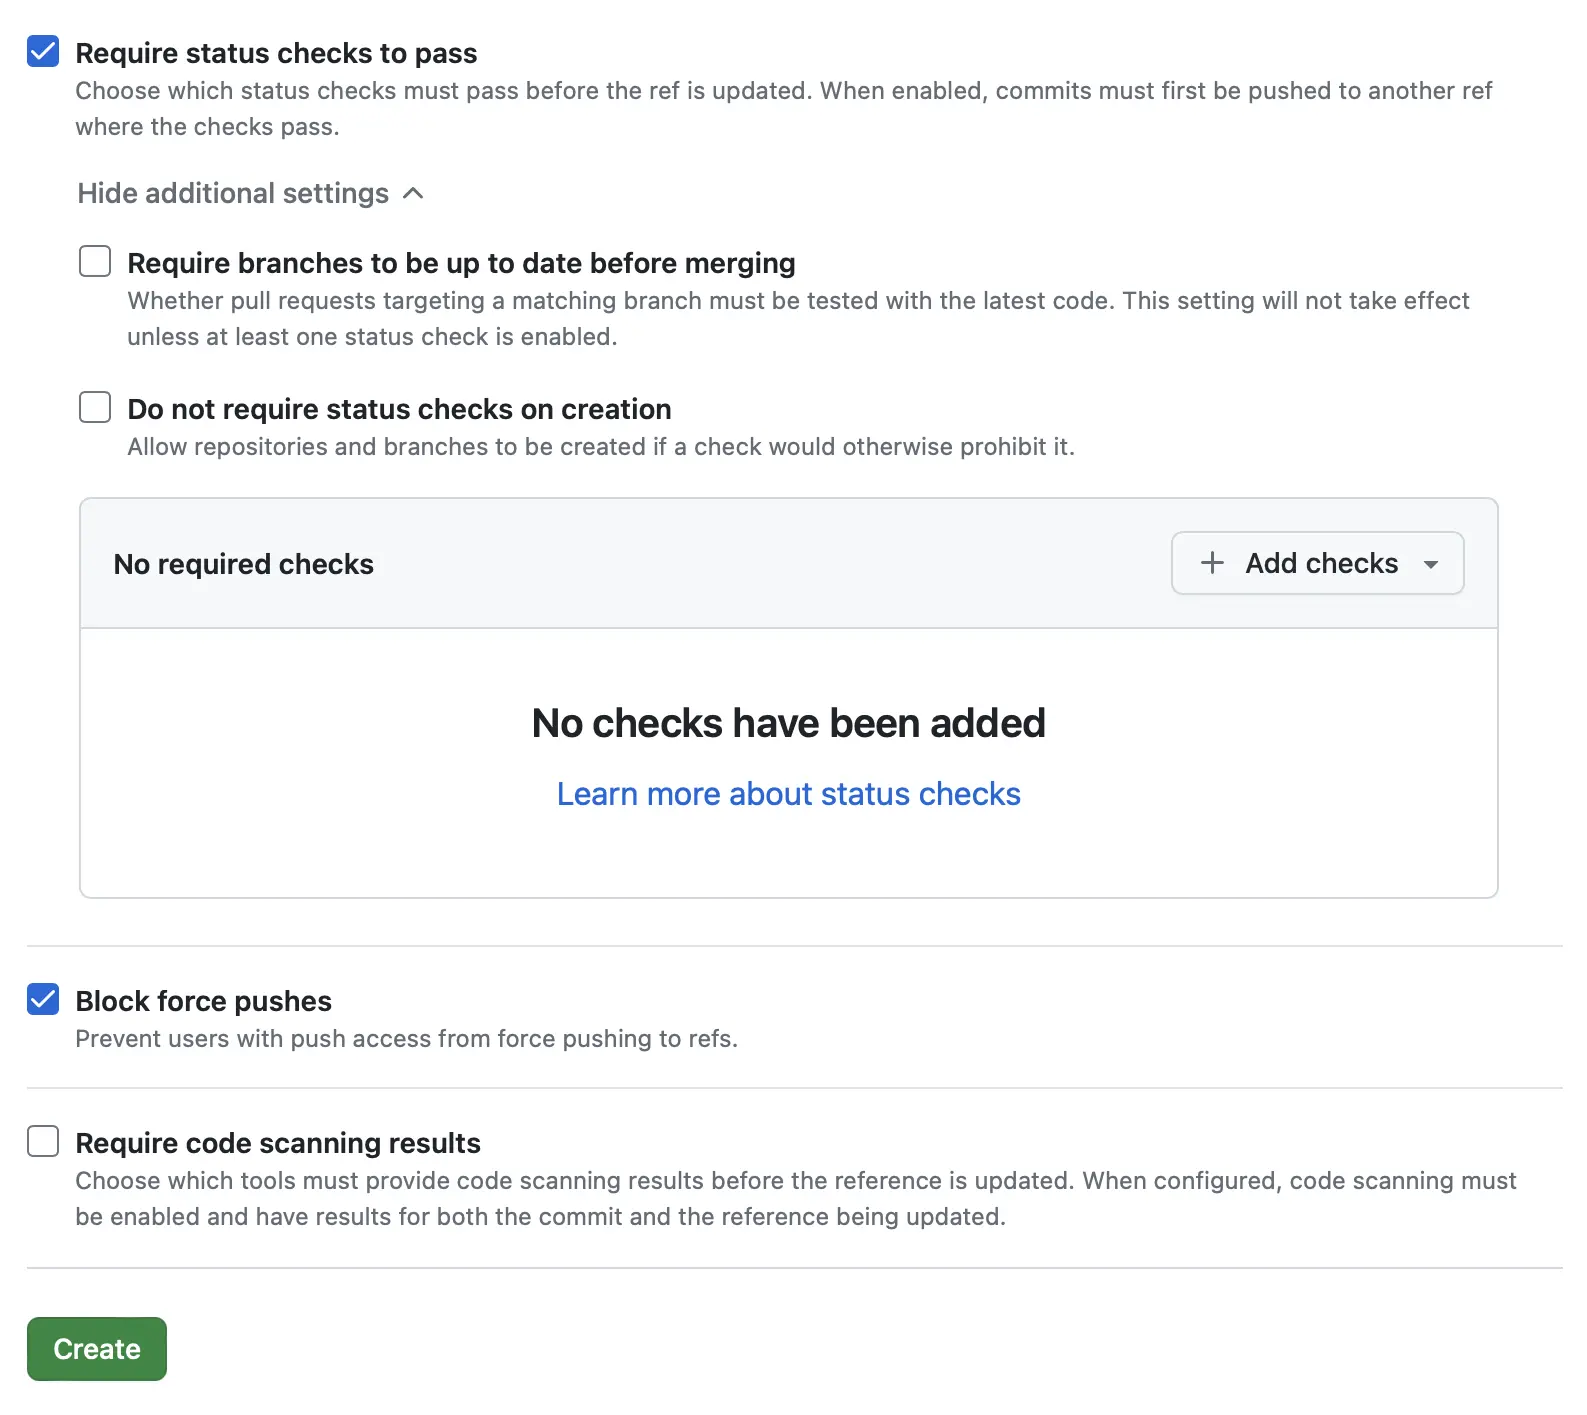
-
Check the option Require branches to be up to date before merging.
-
Click on the Add checks button. In the displayed search input, type “Build”. You’ll see a list of suggestions. Click on Add Build (ubuntu-latest, 20.x).
-
Finally, click the Create button to save your changes.
Testing it all
Congratulations 🎉! Your project configuration is complete, and you can now
start developing your app. To get started, create a feature branch from the
main branch for your specific feature, and push this new branch to the remote
repository. Switch to the feature branch, make your changes, and push them to
the remote repository. Then, open a pull request on the main branch to propose
your changes. Once your pull request passes all CI tests, merge your changes
into the main branch and delete your feature branch
(if it’s no longer needed). To see this process in action, let’s work on a
feature together.
Create and push a feature branch from the main branch
Run the following commands to switch to your main branch, pull from the remote
tracking branch to ensure main is up-to-date with the latest changes in the
remote repository, and create the complete-homepage feature branch from it:
git checkout maingit pull origingit branch complete-homepageThe complete-homepage branch is now created
(run the command git branch to see it). But, the remote repository still does
not have a copy of it. As a best practice, even before you start working on a
feature, it’s important to push this branch to the remote repository so that it
has a copy. This informs other developers
(if you’re working on a team or your project is open-source) about the new
feature you’re working on, potentially avoiding conflicts with other developers
unknowingly working on the same thing.
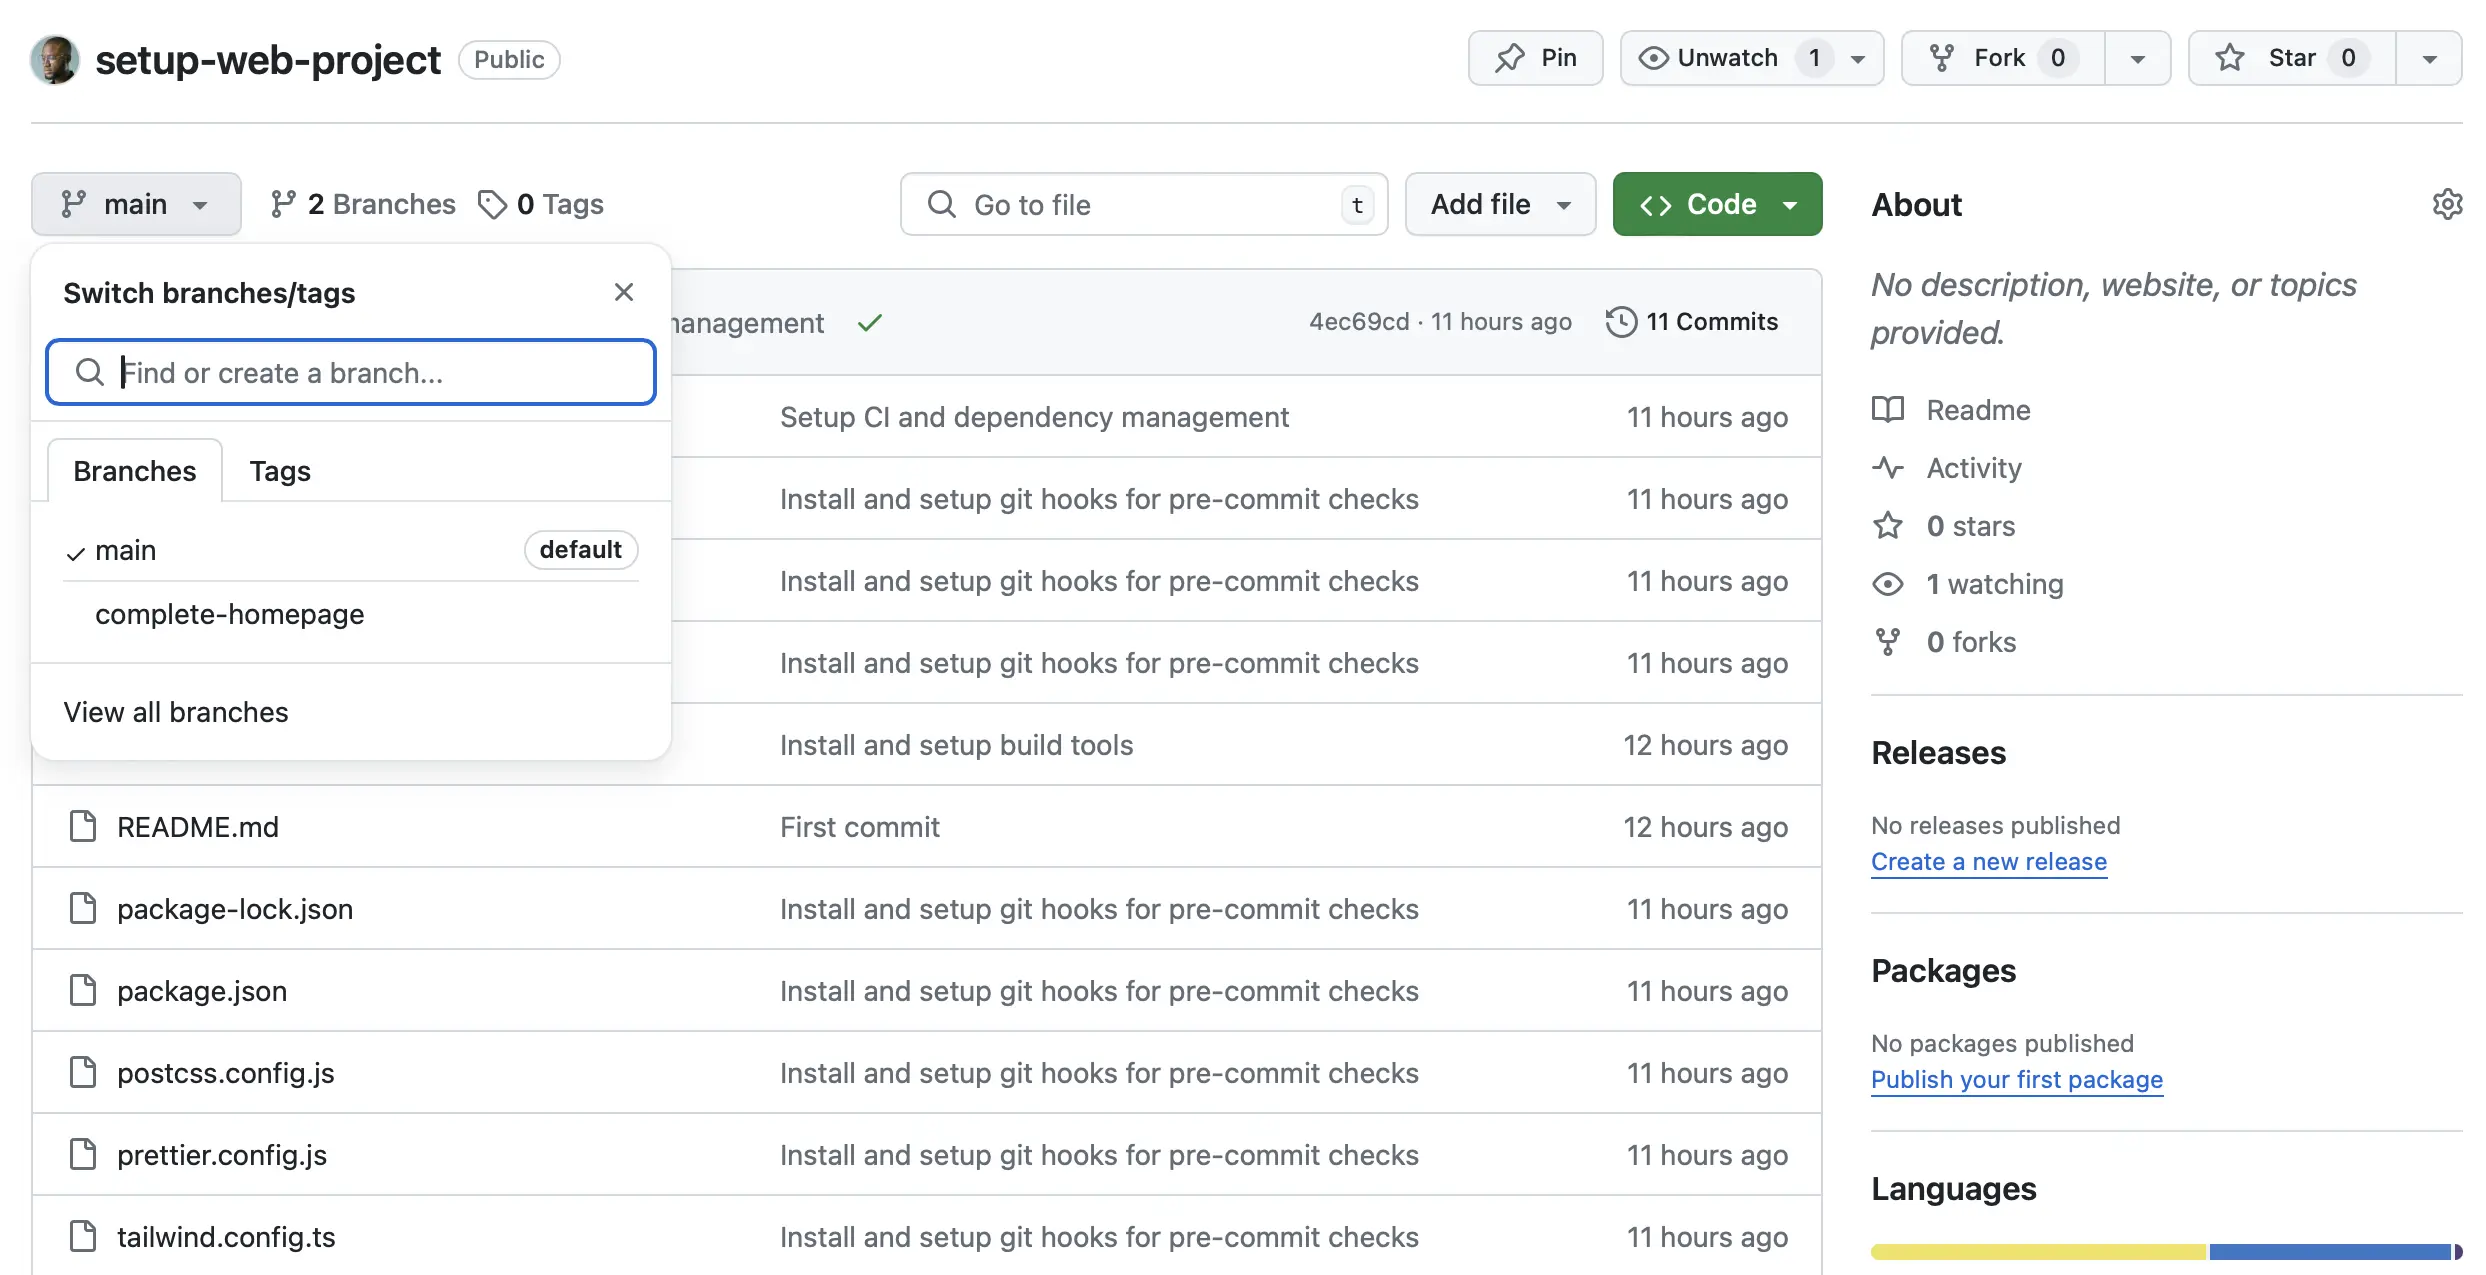
Run the following command to push the new branch to the remote repository:
git push origin complete-homepageAfter running the command successfully, you can check if the feature branch was pushed to the remote repository. To do this, go to your repository, click on the button displaying main with a dropdown icon, and you’ll see a list of all the branches in the repository:
Make and push your changes
Run the following command to switch to the complete-homepage branch so you can
start working on your feature:
git checkout complete-homepageNext, update the app/routes/_index.tsx file with these changes:
export default function Home() { return ( <div className="flex h-screen w-screen items-center justify-center px-5 py-24"> <div className="absolute inset-0 -z-10 h-full w-full items-center px-5 py-24 [background:radial-gradient(125%_125%_at_50%_10%,#000_40%,#63e_100%)]"></div>
<div className="flex max-w-2xl flex-col items-center space-y-6"> <div className="flex"> <span className="relative overflow-hidden rounded-full p-[1px]"> <span className="absolute inset-[-1000%] animate-[spin_2s_linear_infinite] bg-[conic-gradient(from_90deg_at_50%_50%,#171717_0%,#737373_50%,#171717_100%)]" /> <div className="select-none rounded-full bg-black px-3 py-1 text-xs font-medium leading-5 text-slate-200 backdrop-blur-xl"> I'm almost there It's done </div> </span> </div>
<h2 className="text-center text-3xl font-medium text-gray-50 sm:text-6xl"> New project loading... New project's live! </h2>
<p className="text-center text-lg leading-6 text-gray-200"> Setting up and customizing my new web project, integrating tools, and applying best practices for a smooth development process. Stay tuned for more updates! </p> </div> </div> );}And that’s it! Our (simplistic) feature to complete the homepage is done.
Run the following commands to stage, commit, and push your local changes to the
complete-homepage branch on the remote repository:
git add -Agit commit -m "Finish homepage feature"git push origin complete-homepageBefore pushing new changes to a remote branch, it’s important to run git pull
first. This will ensure that your local branch is updated with any new changes
that may have been pushed to the remote branch by others, especially if you’re
working on a team or if your project is open source.
Open a pull request on the main branch
Go to your repository, click on the button displaying main with a dropdown
icon, and on the displayed list of branches, click the complete-homepage
branch. On the complete-homepage branch, your screen should look like this:
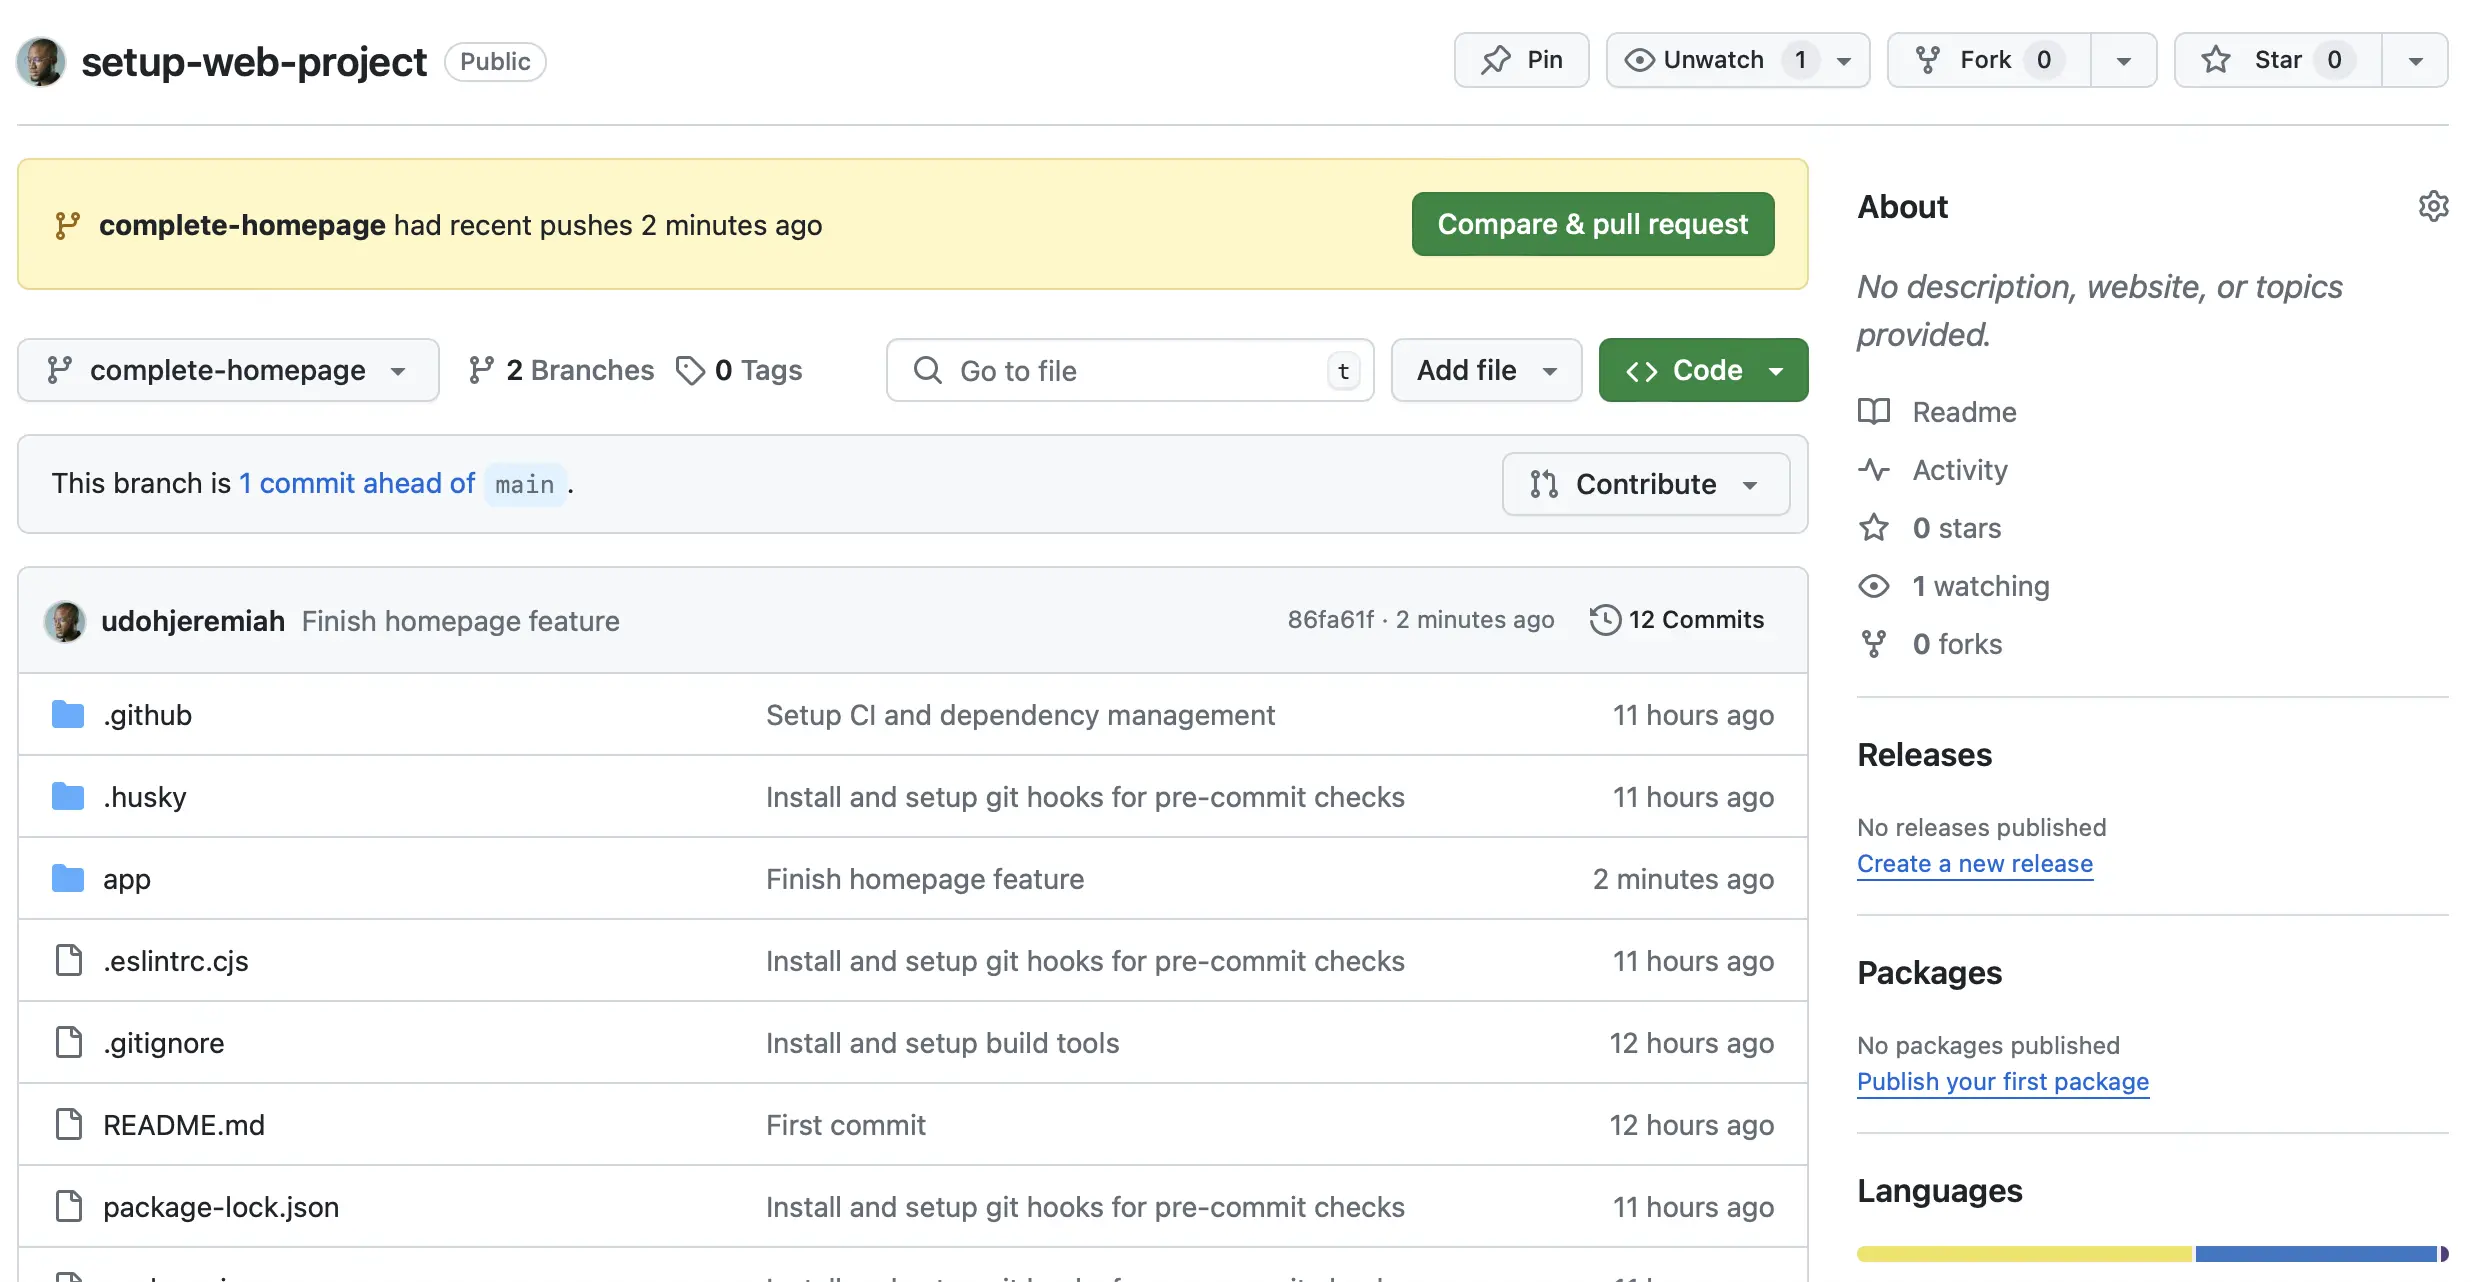
To open a pull request, click on the Compare & pull request button or click
on the button displaying Contribute with a dropdown icon, and click
Open pull request from the displayed dropdown. On the next page, you’re
taken to, enter a description explaining the changes you’ve made. Finally, click
the Create pull request button to open a pull request on the main branch.
Merge your changes into the main branch and delete your feature branch
After clicking the Create pull request button, you should be taken to a pull request page. Wait for your CI tests to complete. After your CI tests are completed, your screen should look like this:

Click on the Merge pull request button and then click Confirm merge. Once the merging is complete, you can delete your branch by clicking the Delete branch button if it’s no longer useful.
If you delete your branch on GitHub, then run the following command to delete
the complete-homepage branch locally:
git checkout maingit branch -D complete-homepageAnd that’s it. Go build the next Facebook.
Conclusion
As a developer, you are often expected to use the automatic installation CLI provided by libraries or frameworks to set up new web projects. But, sometimes the default options provided by these CLIs may not fully meet your needs or may only offer a basic template that doesn’t align with your desired project configuration. This article provided a comprehensive guide for customizing the initialization and configuration of your project, either from scratch or by enhancing the functionality provided by the automatic CLI of your library or framework.
You now have a guide to set up future projects efficiently, consistently, and in a timely fashion. Most importantly, you understand how each process works. You can either use the step-by-step guide as provided or use it as a foundation to customize and fit it to your own needs. In any case, the goal is to have a clear system or guide to follow whenever you start a new project.
Remember, “hackers hack, crackers crack, and whiners whine. Be a hacker.” Take care.