
Introduction
This is part 2, a continuation of, the Remix Todo App series. The goal of this series is to teach you everything about Remix that you’ll use on a daily basis. In part 1 of this series, we built the layout and structure of the todo app using HTML and Tailwind CSS.
In this part, we’ll discuss three essential concepts in Remix:
- data loading
- data writing
- data reloading
Understanding how these concepts work is crucial to using Remix properly and effectively. Misunderstanding them can lead to inefficient—or, worse, incorrect—use of Remix.
Data loading, writing, and reloading
Data loading is the process of retrieving data from a database or API. In Remix,
this is managed by a function called a loader. A loader handles
GET requests
to a route and can return or throw a response.
Data writing (also called data mutation) is the process of writing to a database
or API. In Remix, this is managed by a function called an action. An action
handles non-GET requests to a route and can return or throw a response.
Non-GET requests include
POST,
PUT,
PATCH, and
DELETE.
Data reloading (also called data revalidation) is the process of re-fetching previously retrieved data to ensure it reflects any recent changes. In Remix, this happens automatically after any event that might cause a change in data occurs.
Data flow in Remix
Remix knows which data to load to build your UI and revalidates it after changes to keep the UI in sync with the database or API. But when exactly does Remix do this, and how? The process it follows is known as data flow.
Below is a flowchart that represents the data flow process:
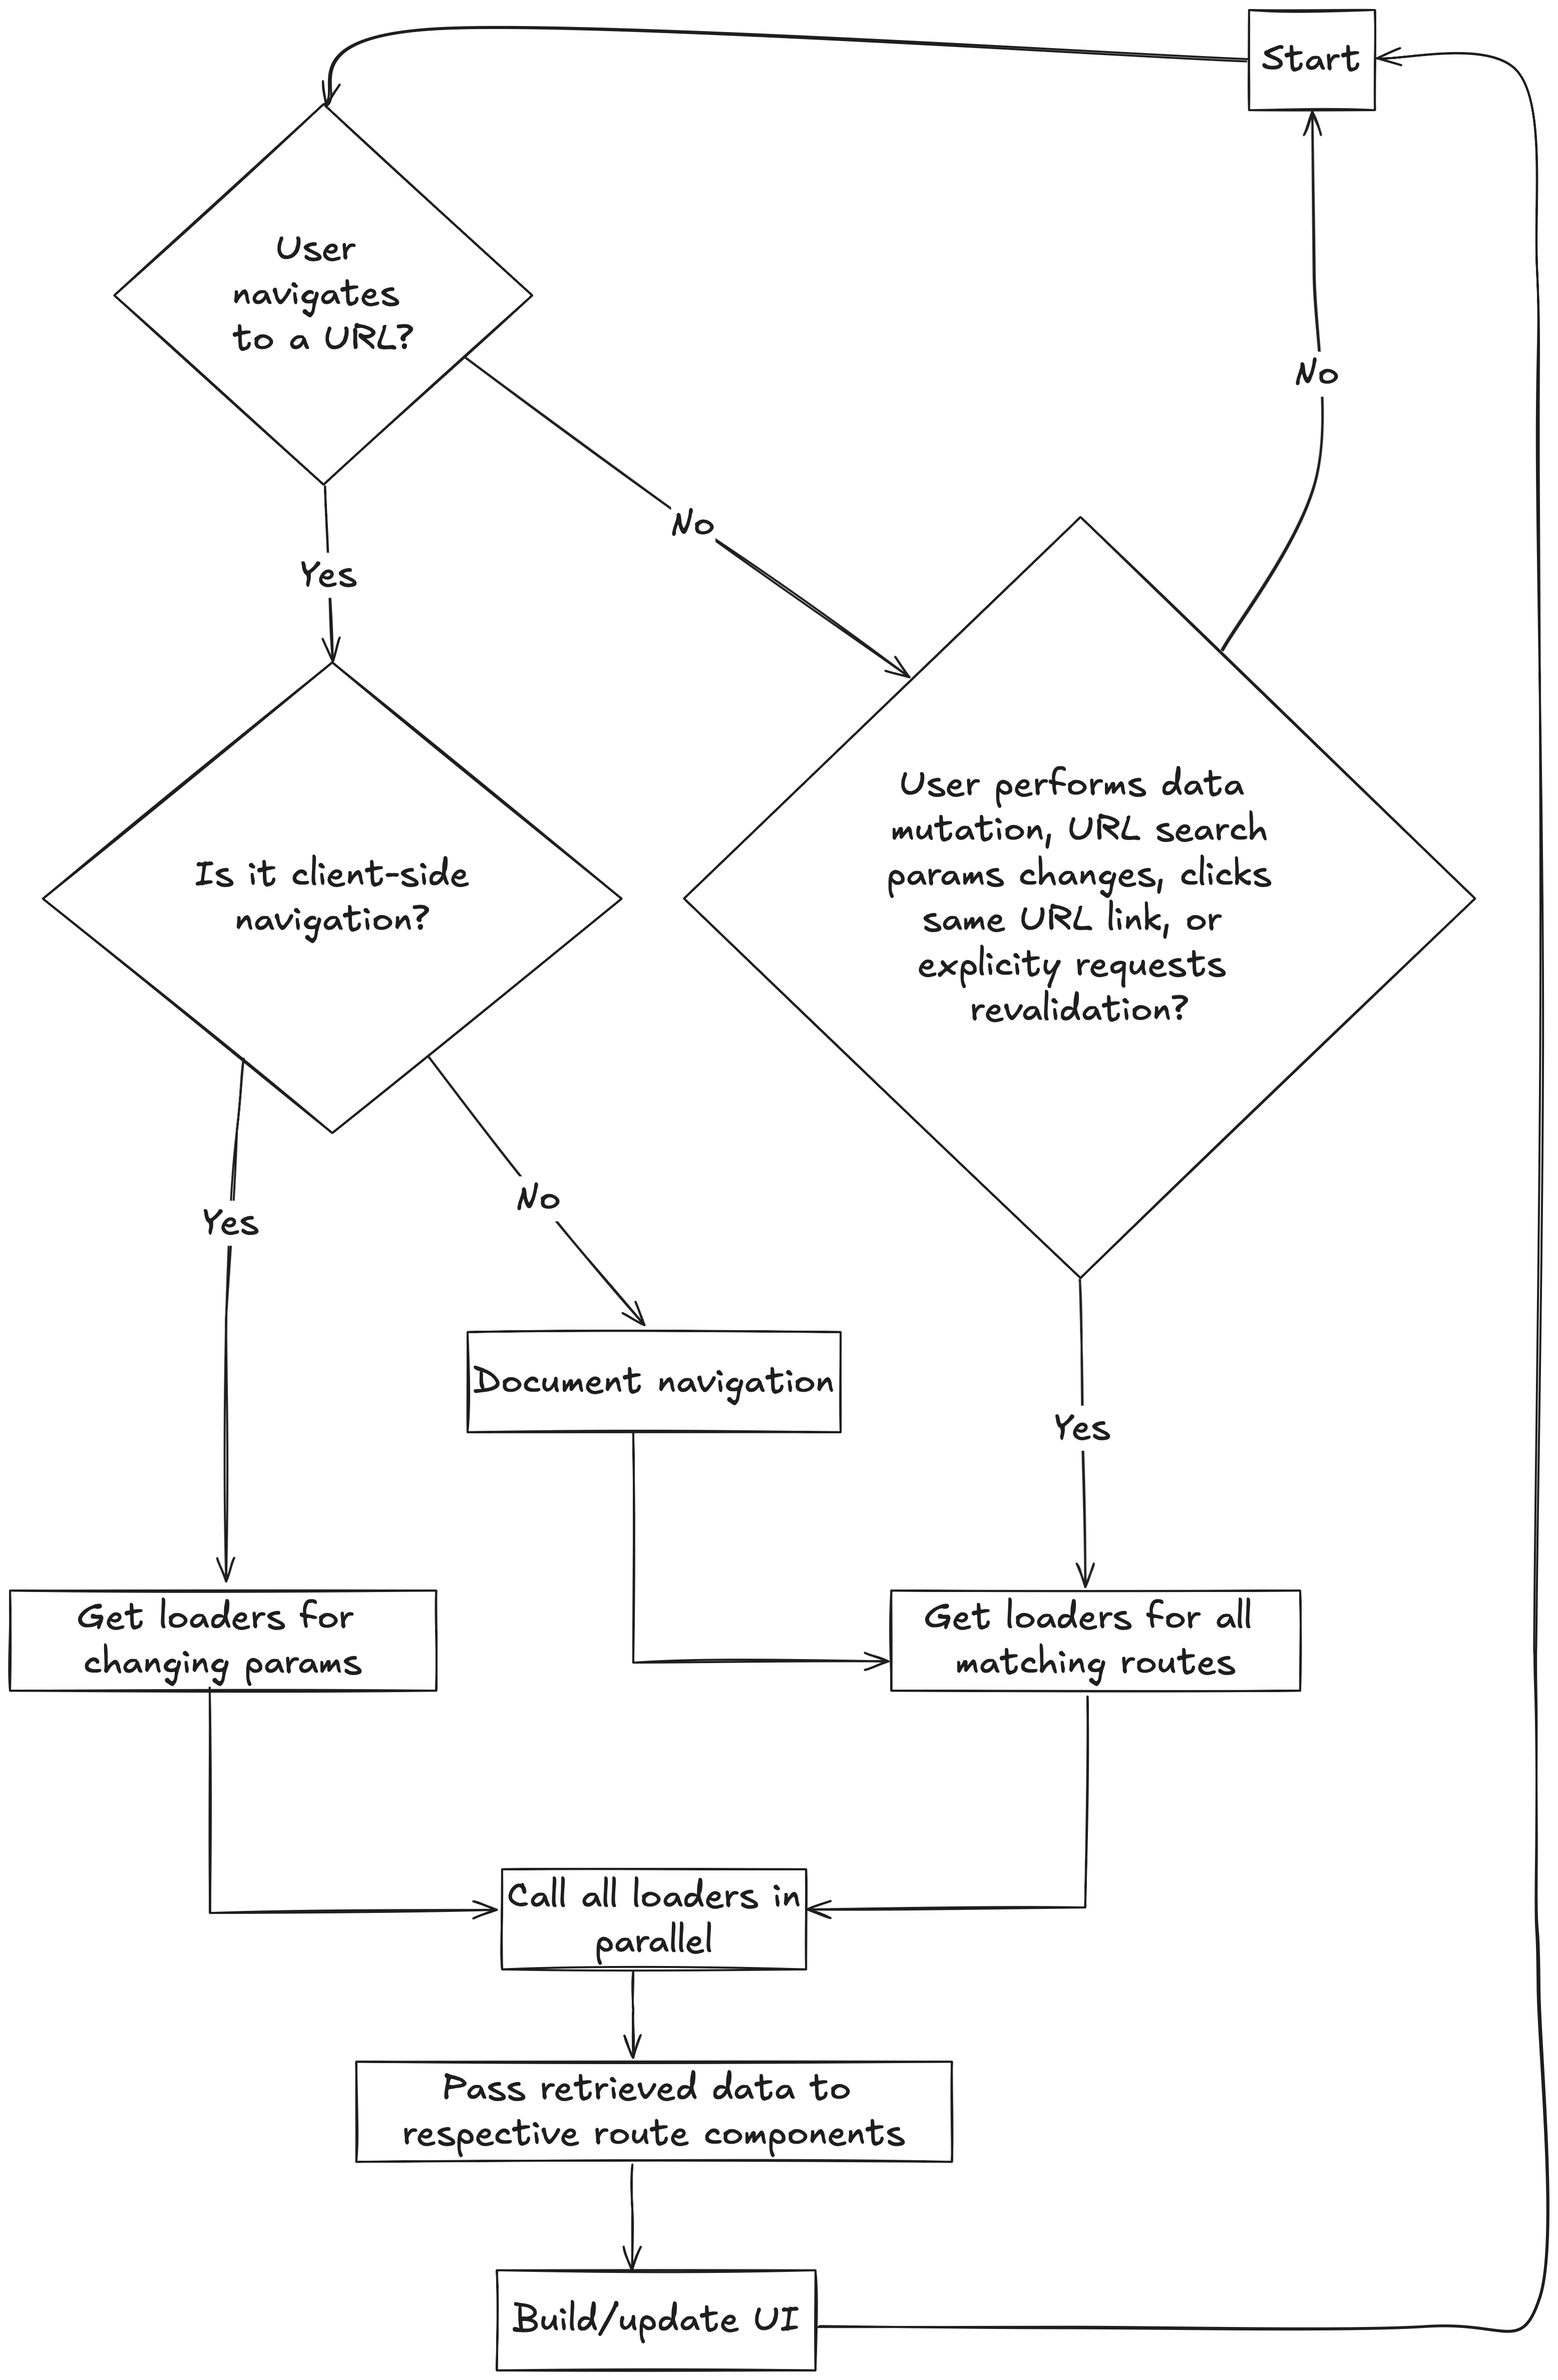
Let’s walk through the flowchart in practice. Imagine example.com is a Remix
app, and you navigate to example.com/ayo/tasks. How you get there matters
because Remix uses this to determine how to load the necessary data for the UI.
If any of the following actions occur:
- You open a new browser tab, type in the URL, and hit enter.
- You click the link from another site.
- You click the link within the app rendered using
<Link to="/ayo/tasks" reloadDocument />. - You click the link within the app rendered using
<a href="/ayo/tasks">. - JavaScript is disabled in your browser.
In any of these cases, Remix treats it as a document navigation, meaning it
loads the full page. Based on
Remix’s nested routing system,
the URL matches multiple routes: the root route, /ayo, and /ayo/tasks. Remix
will call the loader function for all the matching routes in parallel to build
the UI.
Now, say you navigate from /ayo/tasks to /ayo/tasks/settings. If the link is
rendered using <Link to="/ayo/tasks/settings" /> and JavaScript is enabled,
Remix treats this as client-side navigation. It knows which params are
changing and which layouts will persist between the two URLs. So, it only
fetches the data for the changing layouts (if any) and params
(in this case, settings) and uses the cached data for the unchanged layouts
and params to update the UI.
As you can see, Remix doesn’t always call every loader function. By default, it makes some reliable optimizations. But, in some cases, it can’t optimize because it doesn’t have enough information about your code. When this happens, Remix takes the safest approach and revalidates the data for all matched routes. This ensures the UI stays in sync with the database or API.
What triggers data revalidation?
As the flowchart shows, the following events trigger a data revalidation:
-
After a data mutation: This is obvious, as once a route’s action completes, the data in the database or API is considered to have changed.
-
The URL search params changes: This triggers a reload because any loader on the matched routes could be using those params.
-
The user clicks a link to the same URL they are already on: This triggers a reload because the click replaces the current entry in the browser’s history stack.
-
You explicitly requests revalidation using the
useRevalidatorhook: This gives you control over when to revalidate the data on the page for reasons beyond the default triggers.
You can opt out of data revalidation for specific routes using
shouldRevalidate.
This allows you to control which routes should reload data once revalidation is
triggered. But, this comes with the risk of your UI falling out of sync with the
database or API, so use it with caution!
Types of loaders and actions
Web apps can be Multi-Page Applications (MPAs) or Single-Page Applications (SPAs). In MPAs, the browser sends a request to the server for each new page, causing a full reload. In SPAs, JavaScript handles navigation and updates content dynamically without a full reload.
Remix can build both MPAs and SPAs. Unlike traditional MPAs, Remix-built MPAs
also support client-side routing, like SPAs. This is achieved through the
<Link> component. <Link> renders a regular <a> tag, which works without
JavaScript. With JavaScript enabled, Remix intercepts clicks and handles
navigation via client-side routing.
The loader and action functions you define for your routes depend on the type of
app you’re building. You define a server loader and action for a MPA that
interacts with a server. You use clientLoader and clientAction for a SPA
that doesn’t involve a server.
loader and action
For MPAs, route modules in Remix have three main exports:
loader: Anasyncfunction that handles data loading, running only on the server.action: Anasyncfunction that handles data writing, running only on the server.- A
defaultfunction that reads data fromloaderandaction, rendering the UI component.
export async function loader() { // provides data to the component}
export async function action() { // updates persistent data}
export default function Component() { // renders the UI}The flow after data writes differs slightly depending on whether JavaScript is enabled or disabled. Below is a table summarizing the differences:
| Step | JavaScript Enabled | JavaScript Disabled |
|---|---|---|
| 1 | loader provides data to the default component. | loader provides data to the default component. |
| 2 | useLoaderData retrieves data. Remix renders the page server-side and sends HTML to the browser. | useLoaderData retrieves data. Remix renders the page server-side and sends HTML to the browser. |
| 3 | When a non-GET request is made, Remix sends the request to action via fetch. | When a non-GET request is made, the browser sends an HTML document request to action. |
| 4 | Pending states are accessible through useNavigation and useFetcher. | Pending states activate via the browser (e.g., spinning favicon). |
| 5 | After action completes, loader for all matching routes revalidates data. | After action completes, loader for all matching routes revalidates data. |
| 6 | useActionData returns data from action, and useLoaderData returns updated values for each matching route. The UI updates accordingly. | Remix renders the page and sends HTML to the browser. |
clientLoader and clientAction
For SPAs, route modules in Remix also have three main exports:
clientLoader: Anasyncfunction for data loading, running only on the client.clientAction: Anasyncfunction for data writing, running only on the client.- A
defaultfunction that reads data fromclientLoaderandclientAction, rendering the UI component.
export async function clientLoader() { // provides data to the component}
export async function clientAction() { // updates persistent data}
export default function Component() { // renders the UI}Both clientLoader and clientAction receive the same params and request
arguments as their server counterparts. You access the returned data using
useLoaderData and useActionData, just like with server loader and
action. But, clientLoader and clientAction require JavaScript to operate
since they run on the client-side. The flow after data write is similar to that
of server loader and action when JavaScript is enabled (see table above).
How to send requests
So far so good, you’ve learned about data loading, writing, and revalidation in
Remix. Loaders handle GET requests, actions handle non-GET requests, and
Remix manages revalidation. Now, the question is: “How do you send a request?”
If you’re familiar with web development, you know the fetch API can send HTTP
requests, or you might use a library like axios for a
simpler API. In Remix, you can still use fetch or axios, but Remix offers a
better, more streamlined, and web-standard approach: HTML forms. If you
choose to forgo Remix’s approach and use fetch or axios, you’ll need to manage
network requests, race conditions, pending states, and data revalidation—things
Remix handles automatically.
In Remix, requests can be declarative, using HTML forms where the user provides values and submits the form, or imperative, where you as the developer submit the form.
Declarative approach
In the declarative approach, using an HTML <form>, you describe the request
and the shape of the data to be sent. The user then provides values and submits
the form.
When the user submits the form, depending on the value of the method
attribute:
-
If
method="get": The browser serializes the form’s data and appends it to theactionvalue with a?separator. All data on the page is revalidated, and the browser navigates to the resulting URL./*** Default `action` is the current URL (e.g., `localhost:5173`)* Default `method` is `"get"`* On submit, the browser navigates to `localhost:5173/?first=ayo&last=dele`*/<form><input name="first" value="Ayo" /><input name="last" value="Dele" /><button>Submit</button></form> -
If
method="post": The browser serializes the form data and sends it in the request body to the action for the route specified in theactionattribute. The route’s action processes the request, the page data is revalidated, and the browser navigates to the route specified in theactionattribute./*** Say the current URL is `localhost:5173`* On submit, after the `action` processes the request,* the browser navigates to `localhost:5173/new`*/<form action="new" method="post"><input name="firstName" value="Ayo" /><input name="lastName" value="Dele" /><button>Submit</button></form>
Remix offers a <Form> component that enhances the HTML <form>. Unlike the
standard <form>, Remix’s <Form>:
- Allows HTTP methods beyond
GETandPOST - Submits data via
fetchinstead of a document request - Provides pending states using
useNavigationinstead of showing a spinning favicon
A key difference between <Form> and <form> is that when the action
attribute is omitted, <form> defaults to the current URL, while <Form>
defaults to the route where it’s rendered. For consistent behaviour, use
<Form reloadDocument /> instead of <form> if you want to let the browser
handle the pending UI, as it behaves like a native <form> but defaults to the
route where it’s rendered.
Imperative approach
In the imperative approach, you the developer, not the user, submit the form. You can still define the request and data structure in the form, allowing the user to input values, or you can manually provide the data. Ultimately, you control when and how the form is submitted.
Common use cases include:
- Submitting a form when the user selects an item from a dropdown
- Submitting a form after the user completes a task or action
- Submitting a form when a specific condition is met, such as a timer or an external event
To programmatically submit a form in Remix, you use useSubmit. This hook
submits a form the same way as a user-initiated submission through a <Form>,
ensuring it follows the same workflow:
import { Form, useSubmit } from "@remix-run/react";
function SomeComponent() { const submit = useSubmit();
// Data can be a `FormData` instance const formData = new FormData(); formData.append("myKey", "myValue"); submit(formData, { method: "post" });
// Or, it can be a plain object that will be serialized as `FormData` submit({ myKey: "myValue" }, { method: "post" });
// Or, a plain object that will be serialized as JSON submit({ myKey: "myValue" }, { method: "post", encType: "application/json" });
// Or, an HTMLFormElement instance where the user provides the value but you do the submission <Form method="post" onChange={(event) => { submit(event.currentTarget); }} > <input name="myKey" />; </Form>;}Building an in-memory database
Now that the theory is out of the way, let’s put what we’ve learned into practice and continue building the todo app.
We’ll define a loader and action for the index route to retrieve and create new tasks. We haven’t added a database for reading and writing yet, but we don’t need one for now. All we need is to simulate CRUD operations in the app. A simple in-memory database that loses its data whenever we restart the server will suffice. Let’s build it.
Run the following command to create a app/types.ts file, which will hold all
the TypeScript types for the app:
touch app/types.tsNow, run the following commands to create a app/lib/db.server.ts file, which
will contain the code for the simulated database:
mkdir -p app/lib && touch app/lib/db.server.tsCopy the following code into app/types.ts:
/** * Represents an individual todo item. */export interface Item { /** * Unique identifier for the item. */ id: string;
/** * Description of the todo item. */ description: string;
/** * Whether the item is completed. */ completed: boolean;
/** * The date and time when the item was created. */ createdAt: Date;
/** * The date and time when the item was marked as completed. This field is optional and only present if the item is completed. */ completedAt?: Date;
/** * Whether the item is currently being edited. This field is optional. */ editing?: boolean;}
/** * Represents operations that can be performed on todo items. * This includes creating, reading, updating, and deleting todo items, * as well as clearing completed items or deleting all items. */export interface Todo { /** * Creates a new todo item. * @param {string} description - The description of the new todo item. * @returns {Promise<Item>} A promise that resolves to the newly created todo item. */ create: (description: string) => Promise<Item>;
/** * Retrieves all todo items. * @returns {Promise<Item[]>} A promise that resolves to an array of todo items. */ read: () => Promise<Item[]>;
/** * Updates an existing todo item by its ID. * @param {string} id - The unique identifier of the todo item to update. * @param {Partial<Omit<Item, "id" | "createdAt">>} fields - An object containing the fields to update. * @returns {Promise<Item | undefined>} A promise that resolves to the updated todo item, or `undefined` if the item was not found. */ update: ( id: string, fields: Partial<Omit<Item, "id" | "createdAt">>, ) => Promise<Item | undefined>;
/** * Deletes a todo item by its ID. * @param {string} id - The unique identifier of the todo item to delete. * @returns {Promise<Item | undefined>} A promise that resolves to the deleted todo item, or `undefined` if the item was not found. */ delete: (id: string) => Promise<Item | undefined>;
/** * Clears all completed todo items. * @returns {Promise<Item[]>} A promise that resolves to the updated list of todo items. */ clearCompleted: () => Promise<Item[]>;
/** * Deletes all todo items. * @returns {Promise<Item[]>} A promise that resolves to an empty array. */ deleteAll: () => Promise<Item[]>;}Copy the following code into app/lib/db.server.ts:
import type { Item, Todo } from "~/types";
/** * List of todo items. */const items: Item[] = [];
/** * Simulates an artificial delay in async operations to mimic real-world API behaviour. * @returns {Promise<void>} A promise that resolves after the delay. */async function simulateDelay(): Promise<void> { const ARTIFICIAL_DELAY = 1000; await new Promise((resolve) => setTimeout(resolve, ARTIFICIAL_DELAY));}
/** * An implementation of the `Todo` interface that manages a collection of todo items. */export const todos: Todo = { async create(description: string) { await simulateDelay();
const createdTodo: Item = { id: Math.random().toString(16).slice(2), description, completed: false, createdAt: new Date(), };
items.push(createdTodo);
return createdTodo; },
async read() { await simulateDelay();
return items; },
async update(id: string, fields: Partial<Omit<Item, "id" | "createdAt">>) { await simulateDelay();
const itemIndex = items.findIndex((item) => item.id === id);
if (itemIndex === -1) { return undefined; }
const updatedTodo: Item = { ...items[itemIndex], ...fields, completedAt: fields.completed ? fields.completedAt : undefined, };
items[itemIndex] = updatedTodo;
return updatedTodo; },
async delete(id: string) { await simulateDelay();
const itemIndex = items.findIndex((item) => item.id === id);
if (itemIndex === -1) { return undefined; }
const [deletedTodo] = items.splice(itemIndex, 1);
return deletedTodo; },
async clearCompleted() { await simulateDelay();
for (let i = items.length - 1; i >= 0; i--) { if (items[i].completed) { items.splice(i, 1); } }
return items; },
async deleteAll() { await simulateDelay();
items.length = 0; return items; },};That’s it! You can review the code if you’d like—it’s simple and easy to understand. Essentially, it’s an array that stores tasks and an exported object containing functions to add, update, or delete items from the array.
Loading tasks into the component
Update app/routes/_index.tsx to add the loader function that retrieves tasks
from the database and displays them on the UI:
import type { MetaFunction } from "@remix-run/node";import { Link, json, useLoaderData } from "@remix-run/react";
import { todos } from "~/lib/db.server";
// ...existing code here remains the same
export async function loader() { return json({ tasks: await todos.read() });}
export default function Home() { const tasks: string[] = []; const { tasks } = useLoaderData<typeof loader>();
return ( <div className="flex flex-1 flex-col md:mx-auto md:w-[720px]"> {/* ...existing code here remains the same */}
<main className="flex-1 space-y-8"> {/* ...existing code here remains the same */}
<div className="rounded-3xl border border-gray-200 bg-white/90 px-4 py-2 dark:border-gray-700 dark:bg-gray-900"> {tasks.length > 0 ? ( <ul> {tasks.map((task) => ( <li key={task.id}>{task.description}</li> ))} </ul> ) : ( <p className="text-center leading-7">No tasks available</p> )} </div>
{/* ...existing code here remains the same */}
{/* ...existing code here remains the same */} </main>
{/* ...existing code here remains the same */} </div> );}We returned the response from loader using the json utility from Remix,
which simplifies creating application/json responses. Alternatively, we
could’ve constructed the full response using a
Fetch Response:
return new Response(JSON.stringify({ task: await todos.read() }), { headers: { "Content-Type": "applications/json; charset=utf-8", },});Adding new tasks
Update app/routes/_index.tsx to add the action that writes to the database to
create new tasks:
import type { ActionFunctionArgs, MetaFunction } from "@remix-run/node";import { Form, Link, json, useLoaderData } from "@remix-run/react";
import { todos } from "~/lib/db.server";
// ...existing code here remains the same
// ...existing code here remains the same
export async function action({ request }: ActionFunctionArgs) { const formData = await request.formData();
const { description } = Object.fromEntries(formData); await todos.create(description as string);
return json({ ok: true });}
export default function Home() { const { tasks } = useLoaderData<typeof loader>();
return ( <div className="flex flex-1 flex-col md:mx-auto md:w-[720px]"> {/* ...existing code here remains the same */}
<main className="flex-1 space-y-8"> <form className="rounded-full border border-gray-200 bg-white/90 shadow-md dark:border-gray-700 dark:bg-gray-900"> <Form method="post" className="rounded-full border border-gray-200 bg-white/90 shadow-md dark:border-gray-700 dark:bg-gray-900" > <fieldset className="flex items-center gap-2 p-2 text-sm"> <input type="text" name="description" placeholder="Create a new todo..." required className="flex-1 rounded-full border-2 border-gray-200 px-3 py-2 text-sm font-bold text-black dark:border-white/50" /> <button className="rounded-full border-2 border-gray-200/50 bg-gradient-to-tl from-[#00fff0] to-[#0083fe] px-3 py-2 text-base font-black transition hover:scale-105 hover:border-gray-500 sm:px-6 dark:border-white/50 dark:from-[#8e0e00] dark:to-[#1f1c18] dark:hover:border-white"> Add </button> </fieldset> </form> </Form>
{/* ...existing code here remains the same */}
{/* ...existing code here remains the same */}
{/* ...existing code here remains the same */} </main>
{/* ...existing code here remains the same */} </div> );}We updated <form> to <Form> to set the form’s action URL to the route it’s
rendered on and changed the request method from GET to POST for mutations.
Then, we added an action to handle the request. In the action, we retrieved
the form data, extracted the task description, created a new todo item, and
returned a success JSON response. To test, enter a task and submit the form, and
your new task should appear in the list. Huzzah!
Conclusion
In this part of the series, you learned about data loading, writing, and revalidation in Remix, and how it works. You created a simulated database, retrieved data from it with the loader, and wrote to it using a form and the action.
In the next part, you’ll learn how multiple form submissions and concurrent mutations work in Remix. This will enable you to complete, edit, and manage different tasks concurrently. Stay tuned!